S.W.A.T Red, White, & Blue Blog Hop

Saturday, June 29, 2013

Are you hopping along this weekend with Practical Scrappers, keep scrolling for the Project Life post and a chance to win some mega good stuff! 


Welcome to the first 
S.W.A.T Design Team Blog Hop

Today S.W.A.T is welcoming our new team with a Blog Hop & Challenge! I'm so excited to be joining this team for another term. There are some seriously talented, beautiful, kind ladies, and you're going to have the best time hopping along with us!

Now let's get to the challenge! This beautiful color palette:  


And here's what I created:

I love these photos from a few years ago as we lit off sparklers. Unfortunately, everyone was wearing every possible color but red, white, and blue. What's a girl to do? Change it to black and white! Now the theme and color of the pictures is in perfect harmony with the color combo of the challenge and this line of paper and embellishments from We R Memory Keepers. 

I used embossed cardstock stickers from the collection all over the layout, but wanted to add a little dimension. So I rubbed a small amount of baby powder on the backside of the stickers to deactivate the adhesive. Foam risers were then added to the back of the banner and rainbow to pop them off the page!

And who doesn't love bunting?! I cut triangles from the patterned papers and adhered them to the page after drawing a line with an acid-free marker. The base set of flags were adhered with liquid glue directly to the page. Whereas the front set were adhered with foam risers. 

So now its up to you to create something using the colors Red White & Blue and link it up at S.W.A.T for a chance to win a pretty prize pack. All entries must be received by July 28th 11:59PM EST. There's a beautiful Pink Paislee Kit up for grabs!

Let's not forget about the giveaway for participating in this blog hop - A Webster's Warehouse Box packed full of beautiful fun from Webster's Pages! As you make your way along the hop, you will find clue words that complete a quote. My word is: THE 

Don't forget the rules for playing!
  1. You MUST be a follower of each S.W.A.T Girl’s blog and leave a comment on each blog and;
  2. You MUST also be a follower of the S.W.A.T blog.
  3. You must email your quote answer to: swatscrappygirl@gmail by Monday July 1st at 11:59PM EST
Thank you for hopping along with us today. We hope you found some inspiration and had fun! It's time to announce our new team. Make sure you visit the entire team as some members are hosting additional blog challenges during the hop and offering their own extra goodies for you. Here they are, along with the order of the hop in case you get lost. Your next stop is Nicolle!
Nicole (That's me!)
Venetia  

Project Life Blog Hop

Friday, June 28, 2013

Hello and welcome to the PRACTICAL SCRAPPERS and SCRAPTOWN LADY Blog Hop! We thought it would be fun to combine forces and share projects with you that have our design teams’ takes on one of the hottest scrapbooking trends around: Project Life.

Whether you are a “Project Lifer,” are interested in Project Life, or just want to find out ways to use all those fantastic Project Life types of products and ideas on your own projects, we have a hop FULL of inspiration and creativity!

We’ve got a fabulous prize, too - a $25 gift certificate to Scraptown Lady’s shop, which is stocked with awesome scrapbooking supplies! What do you have to do to be entered in the drawing? It’s easy!

1. Be a follower of Practical Scrappers; and
2. Be a follower of Scraptown Lady; and
3. Visit all the blogs, starting with Practical Scrappers and ending with Scraptown Lady, and leave a comment at each blog along the way.

We will be hopping until Sunday, June 30th, at 11:59 p.m. CST. The grand prize winner will be announced on Tuesday, July 2nd!

Project Life Spread by She Zig Zags

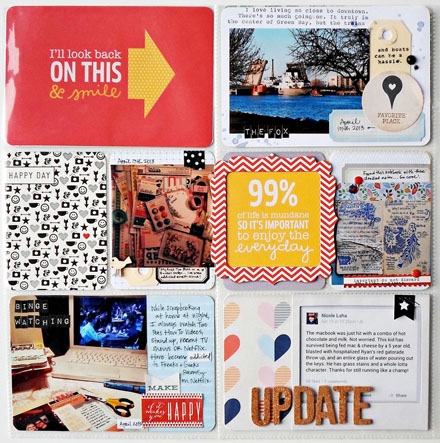
For those who are unfamiliar with Project Life, it is a system developed by Becky Higgins for documenting the every day. You'll find most "project lifers" create a two page spread for every week of the year. That's not how you'll find my spreads. I keep memorabilia and print off pictures of things I find important and want to remember. I place these in my album in chronological order. A spread may document a day, a week, or a month. Some of the items included don't seem to NEED a full 12x12 traditional layout, but I want to include it. This spread is a prime example of that. 

Project Life Spread by She Zig Zags

In the page above, I included a large scrapbooking purchase that I geeked out about, some doodles on notes, a tv show I was addicted to, a Facebook update, and a picture of a boat as I waited to cross into downtown where I live. These small, semi-weird things to include in a scrapbook show my passions, what I watched, how I learned, where I lived, and so much more. Sometimes I wish I could pick up an album and see these details in one of my parents or grandparents lives. It's from that place that I enjoy including the Project Life pages in my albums alongside traditional layouts. The Project Life system can so easily be customized to your time, life, and style, and I'm positive you'll see that while hopping along today! 

Project Life Spread by She Zig Zags

Project Life Flip Pocket

I love these flip pockets by Close To My Heart... They come in several smaller sizes that are perfect for adding additional photos to my spreads. For this page, I added a pocket to the top left photo sleeve. I was able to include the "pretty" and "not so pretty" aspects of throwing a bridal shower. The photo below shows you the spread with the pocket raised. 

Project Life Studio Calico Spread by She Zig Zags

Tim Holtz Vial Labels are another favorite Project Life supply of mine. It's so easy to stick them to a photo or journaling card and add a date, name, or note. 

Spray Ink Project Life Card

Another hot trend lately is spray ink. I couldn't resist adding a little to my journaling cards too! I also used several frames to add a little interest to my journaling cards and photos. But what if that frame, sticker, or brad is too large for the photo sleeve? Adhere it to the outside! For this spread, I adhered a frame, thickers, and wood veneers to the outside of the sleeves with a hot glue gun. 

Facebook Status with Project Life

Thanks for stopping by today. I hope you've found a few ideas for your next spread! Don't forget to leave a comment and hop along to the other talented Project Life-loving ladies. You're headed to Claude next. If you get lost along the way, just check the complete list below to get you hopping in the right direction:

Nicole Laha (me!)

Lastly, if we have inspired you so much that you “need” to do a little shopping now, SCRAPTOWN LADY is offering 20% off all orders during the hop! The sale runs from now ‘til midnight Monday. Enter “code20” to receive your discount.

You can see all of my Project Life posts here.

Faux Letterpress Backgrounds

Thursday, June 27, 2013

Good afternoon! I love the look and feel of letterpress stationary. I recently used that as inspiration for the card below, creating a faux letterpress background.

For the background I used an embossing folder from Lifestyle crafts and Marvy ink pads in neon colors. I gently rubbed the ink pads (starting with the lightest color first) directly onto the raised design inside the embossing folder. 

A piece of white cardstock was used as the base and placed in the embossing folder before it was run through a die cutting machine. The embossed design and ink transfers to the cardstock with little effort!

I finished up the card with a strip of holographic paper that really plays up the neon colors and a stitched design from Amy Tangerine's Capture Kit.

Have you tried this technique yet? It's one of my favorite ways to add texture and color!

 CARD SUPPLIES
Cardstock, Holographic Paper: Paper Cut
Inks: Marvy Matchables
Embossing Folder: Lifestyle Crafts (Sketchbook)
Tools: Amy Tangerine Capture Embroidery Kit

More Glitter Cupcakes...

Wednesday, June 26, 2013

I couldn't help but share a few more cards featuring Elizabeth Craft Designs glitter, double sided adhesive, and peel-off stickers. You can see my first post here.

All of the glitter on today's cards were colored with Copic markers. This first card, I only used one marker per color (flat coloring). I just love how bright and bold this technique is. Because the glitter and sticker were adhered to white cardstock, it was easy to pop it up off the card with foam risers.

For the next card, I chose to try to blend with the markers. 

I always use three markers per color to blend. However, the smaller areas such as the cherry and frosting seemed to blend flawlessly with only two markers. Blending on the glitter seemed far easier than blending on cardstock! I tried only two markers with the purples, but looking now, I wish I would have added a third color to create a better blend. With that said, I love the look. I want to eat that cherry!

Copic markers are perfect for coloring brads and rhinestones too. You can see in the picture below that I created custom embellishments by using the same marker!

View my recent tutorial for these glittered cupcakes on the Creations Galore blog by clicking this link. If you try this technique, I'd love to see your creation... Please leave a link in the comments!

CARD ONE SUPPLIES
Cardstock, Vellum: Paper Cut
Inks: Mister Huey's (Dewey), Copic Markers (Y11, BG15, V15, R24), StazOn (Jet Black)

CARD TWO SUPPLIES
Cardstock, Vellum: Paper Cut
Patterned Paper: American Crafts (My Girl Collection)
Inks: Mister Huey's (Dewey), Copic Markers (Y11, RV25, RV29, V12, V15, BG11, BG15), StazOn (Jet Black)
Embellishments: BoBunny

Coloring Glitter with Copics :: A Tutorial

Wednesday, June 26, 2013

Hello friends. You can find me on the Creations Galore blog today posting a tutorial using Elizabeth Craft Designs Microfine Glitter, Double Sided Adhesive, and Peel-Off Stickers. It was such a fun product to use, and the results were incredible. 

I have a no glitter in the house rule, so I was a tad nervous to give this a try. Glitter sticks to anything and everything. I cringed at just the thought of coloring over the glitter with my Copic markers. Wouldn't it ruin them?! I'm here to tell you it didn't. When it came to working with the glitter; however, I developed a few tips and 'don't do this' moments. Check it out

I found these fantastic library pockets at Creations Galore. They're the perfect size for a gift card and a tag with a handwritten note. 

Check out the Creations Galore blog for the full tutorial. Enjoy your day!

Use It Tuesday :: Bring on the Sunshine

Tuesday, June 25, 2013

Hey there hoarders! It's time for a new Use It Tuesday challenge. This week we're celebrating that bright star that warms our days with a challenge we call... BRING ON THE SUNSHINE! 

Remember, all of our challenges call for you to use your hoarded supplies, so dig into your stash, make something bright and sunny, and proudly tell us what you used! You have until Noon EST on Friday, July 5th to link up your creation to the Use It Tuesday blog. As always, one lucky participant will be randomly chosen to be a featured guest designer!

For my sunshine-filled project, I created the above card. I started with this great patterned paper from Dear Lizzy and used watercolors to add orange, pink, and yellow to the background. Unfortunately, I didn't wait long enough for the watercolors to dry when I added the ink. Therefore, the bicycle image is a little faded. Note my mistake and learn, right ladies?! 

The card seemed a little plain -- I'm quickly learning that the idea of negative space just isn't my style -- so I added some splatters of Mister Huey's mists in bright colors as well. I've had the glitter stars in my stash for quite a while. They were on clearance, so I juuuuust haaaaaad to buy them. This challenge's theme was the perfect time to get them out. A pearl was placed on each sequin and added around the stars to complete the embellishing. I'll also add that the stamp was un-inked in my stash. Thanks Use It Tuesday for challenging me to USE IT! 

Thanks for checking out my take on this challenge... Make sure to head to the Use It Tuesday blog to check out my fellow Design Team Members and link up a bright and sunny project of your own! 

CARD SUPPLIES
Cardstock: A Muse Studio (Apricot, Onyx, Sugar)
Patterned Paper: American Crafts (Dear Lizzy Carwheel Court)
Stamps: Unity Stamp Co (Basket Full of Wishes)
Inks: StazOn (Jet Black), Mister Huey's (Sherbet, Leaf Green)
Embellishments: A Muse Studio (White Pearls)
Tools: Close To My Heart (Paper Distresser)

An Old Fashioned Hello

Monday, June 24, 2013

Hello bloggers! I hope you all had an enjoyable weekend. Today I'm sharing a card that says hello the old fashioned way. I'm addicted to snail mail, vintage finds, and paper, so this combines all my favorite things into one.

The papers are from an older collection by We R Memory Keepers, called Antique Chic. The muted tones and distressed patterns fit the sentiment perfectly. Thanks for stopping by today!

CARD SUPPLIES
Cardstock: Paper Cut (Via Cream, Black Linen)
Patterned Paper: We R Memory Keepers (Antique Chic)
Stamps: Hot Off The Press
Ink: StazOn (Jet Black)

Project Life Update :: February

Friday, June 21, 2013

Hello bloggers! My project life is caught up through April in physical form... But when it comes to sharing it on the blog, we're still in January! What?! It's about time I started letting you into my weeks! So here I am with some of my February spreads. 

I don't include week numbers in my version of Project Life. As you'll see in this post, there are full pages sometimes dedicated to a single event and others that seem to have no cohesive thought. It may seem a bit chaotic for most, but it's how I think. *insert laugh and a bit of judgement here* My personality sure is shining through! Life documentation is all about YOU, and I've been working hard to stay true to that rather than compare myself to others or conform to a certain style. Creativity just shouldn't be forced, right?! I hope you can follow along, enjoy the journey with me, and find a bit of inspiration. 

I'm also working on documenting the good and the bad, the struggles and victories. We are made up of all those things... And if someone will look back at these albums to discover who I was, they'll need the whole picture. I learn the most from a difficulty. And it's important to showcase the experiences that shaped us. In the spreads for February, there were three personal struggles that I highlighted. Wowza! Two have hidden journaling with pockets and the other is featured in the above photo. I have ridiculous vitamin deficiencies that after a year of treatment is still not controlled. I take pills and give myself shots. It's a daily, annoying struggle that I try to internalize. I don't mention it too often or try to complain. I can't put my life on hold for a year or two or fourteen... But it's a real problem that I'm faced with daily that can affect my sleep, work, thought process, and overall mood. So why not document it?! 

I've used the 'I Was Here' stamp set by A Muse Studio in several places. It's a great collection of symbols and sayings as if made just for Project Life. If you haven't gotten your hands on a good set with arrows, cameras, and symbols, I suggest picking up this one! You can find it here.

These Heidi Swapp Neon Letters have quickly become my new favorite thing. I've used them several times in the last few spreads.  

Thanks for stopping by the blog today... and hearing a bit of my heart as I ramble on. I hope you have found a way to document your own story! 

You can see all of my Project Life posts here.

Yummm

Thursday, June 20, 2013

Wisconsin takes things seriously. A few of them include football, beer, and cheese. And I indulged in a few of those last night at one of our favorite places, Titletown Brewing Co. As you can see from the photo above, we may have had one too many home crafted root beers. They're so good, you need two. or three. or seven. Along with cheese fondue and a bison burger. with more cheese.

No Stamp Card Making

Wednesday, June 19, 2013

Good afternoon! One of my favorite products to pick up from any manufacturer are 12x12 cut out sheets. Whether they contain journaling cards, images, or sentiments, I pick them up! I don't mind fussy cutting; therefore, these cut out sheets become inexpensive embellishments! 


Today's card is made from just that! It's easy and fast with no stamp involved!

The 'live in the moment' piece was a 3x4 journaling card from Echo Park's Here & Now collection. I added that to the card with scraps of washi tape, patterned paper, and a random die cut. To add more blue to the card, I cut out the butterfly from Crate Paper's 12x12 Accent Cuts included in the On Trend Collection. To add dimension to the butterfly, I added glue to the center only and used my fingers to pop up the wings. He's ready to fly off the page!

And no project of mine is complete without a little spray ink and some sequins. I challenge you to look at journaling card and accent sheets just a little differently. Do you use them already? 


SUPPLIES
Cardstock: A Muse Studio (Sugar, Wasabi)
Patterned Paper: Echo Park (Flower Buds, 3x4 Journaling Cards), Crate Paper (Accent Cuts), Studio Calico (Ethereal)
Embellishments: A Muse Studio Sequins (Pearl, Gold), Crate Paper (Maggie Holmes Ephemera Pack)
Spray Ink: Studio Calico Mister Huey's (Sherbet) 
Tools: Close To My Heart (Edge Distresser)

On Trend :: Spray Ink

Monday, June 17, 2013

GOOOOOOOOD MORNING! It's Monday, which means it's time for 700 cups of coffee and a post from your Practical Scrappers On Trend Team! 

Today we're bringing you lots of inspiration using a new trend: SPRAY INK! You're going to love all the projects shown on the PS blog today using masks, inks, and more. Here's what I created for the post:

Let's be honest, I went crazy with ink splatters! I really wanted to have the illusion of rain and really added it on with a gold and blue ink. To create the splatters, I uncapped the bottle and gently tapped the nozzle above the paper. This gives much more defined ink splatters than pressing down on the nozzle and spraying.

I also sprayed a tiny bit of mist on my craft mat, picking up the ink with a paint brush and colored in my stamped image. You can create some great watercolor details with this technique. 

Have you tried out this trend on your paper crafting projects? I'd love to hear what you think!

SUPPLIES
Cardstock: A Muse Studio (Sugar, Sky)
Patterned Paper: Studio Calico (Ethereal, Jubilant)
Stamps: Unity Stamp Co (Rain or Shine)
Inks: StazOn (Jet Black), A Muse Studio Splash (Winter Sky), Heidi Swapp Color Shine (Gold)
Proudly designed by Mlekoshi pixel perfect web designs