Embark on Adventures :: Pocket Scrapbooking

Monday, September 30, 2013

Happy Monday! I'm here today sharing a spread from my 2013 album. 


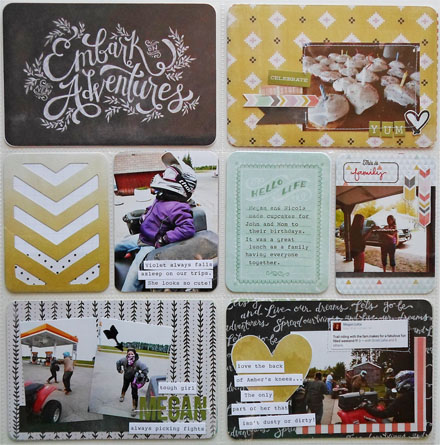
This spread contains pictures and journaling from a recent day trip with my extended family on our atv's. Rather than create 4 to 5 separate layouts, I used pocket page protectors to document the event. It allows each pocket to be its own page with a picture, title, and journaling. I'm loving this project. 

This spread was created with the Chalkboard Albums Made Easy Kit by We R Memory Keepers and all of the photos were taken with my camera (instead of cell phone!).


I included lots of journaling on these cards, printing my photos smaller to incorporate it. The journaling was created on a typewriter, which was cut into strips and adhered to the cards. 


I also included lots of stitching around photos and to secure sticker letters. It added a bit of texture, as well as put emphasis on the photos. 


One of my favorite parts of the spread is the card below. The Albums Made Easy kits come with cut out journaling cards. I adhered one of my photos behind the card and used the typewriter to add simple journaling. I think the 'uh oh' fits perfectly here and gets the point across!


Here's the second page of the spread. You'll notice another cut out card, some stamping, and a screen shot of a Facebook status about the day! 


Thanks for joining me today! Are you a pocket scrapbooker?

SUPPLIES :: We R Memory Keepers Chalkboard Albums Made Easy, Studio Calico & Citrus Twist Stamps, StazOn Jet Black Ink, Simple Stories Sticker Letters & Icons

TOOLS :: American Crafts Page Protectors, Fiskars Scrapbooking Rotary Paper Trimmer, Martha Stewart 1/2" Corner Rounder, Typewriter, Brother Sewing Machine

Drill #16: Sketch & Twine

Saturday, September 21, 2013

Add spray ink to your scrapbook layouts

Happy Saturday, Paper Crafters! It's time for another Drill with S.W.A.T! This week we have a great sketch from our very own, Bev Code. 

Scrapbook sketch

In addition to the sketch, we challenge you to use twine on your project! One lucky participant will receive a $10 gift certificate to 3 Scrappy Boys... Just link up your project by September 28th.

Friendship Scrapbook Layout (via shezigzags.blogspot.com)

I had this photo from a baseball game with dear friends this summer that just needed to be scrapped. I matted the photo with white cardstock and wrapped white twine around the bottom three times. I tied the twine together behind the photo and let the curly ends hang loose. 


Add twine and brads to layouts

Before adhering any of the layers, I added ink splatters to the background in place of the circle element on the sketch. After adhering everything down, it really needed an element there with more weight to it. Therefore, I took a colored pencil and my Martha Stewart Circle Cutter and created a fun half circle on the page. 

Add spray ink to your scrapbook layouts


I can't wait to see your take on the sketch and how you incorporate twine! Looking for more inspiration before diving in? Check out the S.W.A.T blog to see my fellow design team members and their layouts! 

 SUPPLIES :: BoBunny Morning, Studio Calico (Cheerful & Love Wins Papers, Cork Washi Tape, Mister Huey's Silver), Crate Paper (Happy Day & Lifetime Papers, Storyteller Stickers), American Crafts Puffy Vinyl Thickers, We R Memory Keepers Brads, Queen & Co Dots, Ocotober Afternoon Travel Girl Washi Tape

TOOLS :: Fiskars Scrapbooking Rotary Paper Trimmer, MyStik Permanent Adhesive, Close To My Heart Paper Distresser, Martha Stewart Circle Cutter

Project Life with Practical Scrappers

Friday, September 20, 2013

Good morning! It's time for another Project Life feature with Practical Scrappers! This week I've used Project Life pocket page protectors to supplement my 12x12 traditional layout! 


I created this sunburst layout a while back - You can see the full post about it here. I had extra photos from the same afternoon along with important journaling. Therefore, I added a pocket page alongside the 12x12 page in my album to tell the full story! 

I used papers and embellishments from a recent Citrus Twist Scrapbooking Kit and journaling cards and stamps from a Studio Calico Project Life Kit. All of the pictures were taken with my camera instead of cell phone - a rare occurrence. 


I challenge you to use some pockets in your own albums to add additional photos and journaling. Don't forget to head over to the Practical Scrappers blog for more Project Life inspiration!

SUPPLIES :: Citrus Twist Play Land Main Kit, Studio Calico Marks & Co Project Life Kit, Chic Tags Spring Doilies, BasicGrey Hey Boy Die Cuts & Transparencies, October Afternoon Travel Girl Tidbits

TOOLS :: Becky Higgins Design A Page Protector, Fiskars Scrapbooking Rotary Paper Trimmer, Tim Holtz Tiny Attacher, MyStik Permanent Adhesive, Bic Mark-It Ultra Fine Point Black, StazOn Jet Black Ink, A Muse Studio Acrylic Block, Martha Stewart 1/2" Corner Rounder

Happy Thursday

Thursday, September 19, 2013

The sickness to end all sicknesses has kept me in bed the last week. I managed to roll out and head to work this morning, only to have the woooorst series of events unfold. I've now spent the last half hour staring off into space wondering when I'll feel like a normal human being again. Since I have no answer to that sad question, I've dusted off the computer and pledge to bring you a few cards from last week. I'm hoping paper crafting is the cure-all. A girl can dream, right?!


This first card started with the Building Cards Silhouette cut. I knew I wanted a fun pattern behind the negative space and wanted the card to be clean and simple. The entire thing came together in no time at all! I may need to repurpose more of my project life cards this way!


This card was made with lots of punches! Punches are the most neglected tool in my craft room, so I tried to make the most of them here. 


Thanks for stopping by today. I hope your week is looking far, far better than mine. If not, I'm sorry. Now let's try our hardest to put a giant smile on our faces, no matter how fake it is, and make this day count!

Use It Tuesday :: Friendship

Tuesday, September 10, 2013

Hello there! It's time for another challenge with Use It Tuesday! Today we're celebrating friendship!


That's right, FRIENDSHIP! Grab all of your hoarded supplies, and create a layout, card, or other project with a friend theme. For the challenge, I created this fun card using random items found on my craft table. I layered a doily, tag, ribbon scraps, and lots of bling! The hoarded items for this challenge? All of them! Can you believe it?!


Now it's your turn! Link up your project to the Use It Tuesday blog by Friday, September 20th for a chance to be a featured guest designer in an upcoming challenge. I can't wait to see what you create! Make sure to let us know the hoarded item(s) you're using this week.


SUPPLIES :: A Muse Studio (Onyx Chevron Ribbon, Latte Pearls, Sugar & Seattle Cardstock), Heidi Swaap Gold Color Shine, StazOn Jet Black Ink, Studio Calico Marks & Co Stamp, Stampin' Up Vintage Verses Stamp, American Crafts Dear Lizzy (5th & Frolic Brads & Large Tags)

TOOLS :: A Muse Studio Acrylic Block, Fiskars Scrapbooking Rotary Paper Trimmer, MyStik Permanent Adhesive, Scrapbook Adhesives 3D Foam Squares, Martha Stewart Score Board

Feather Love

Monday, September 9, 2013

Hello all! I hope you had a wonderful weekend. It's Monday, which means I'm at Creations Galore preparing three new Make N Takes for this week. I loved the feathers on one of the cards so much that I had to share it with you today!

Live Beautifully Card

The feathers were cut out of American Crafts cardstock with the Silhouette Cameo. You can find the cut files here. Distress Ink was added to the edges and I crinkled the feathers with my fingers for added movement and texture. My favorite part of this card might be the strips of black glitter paper by American Crafts which sadly doesn't show up too well in these photos. It gives just a touch of glam and sparkle, without glitter EVERYWHERE. If you haven't picked up a few sheets of American Crafts POW! paper, you need to!

Die cut feathers

Thanks for stopping by. Don't forget to take a note from today's card - live beautifully & dream passionately. 

SUPPLIES :: American Crafts Cardstock & POW! Glitter Paper, Paper Cut White & White Linen Cardstock, Hero Arts Pearls, KaiserCraft Stamps, StazOn Jet Black Ink, Black Soot Distress Ink Pad & Tim Holtz Foam Ink Applicator

TOOLS :: Fiskars Scrapbooking Rotary Paper Trimmer, MyStik Permanent Adhesive, Hot Glue Gun, Silhouette Cameo, Feather Set Cut

Stamp, Stitch, & Splatter

Saturday, September 7, 2013

Hello Paper Crafters! I'm here today presenting Drill #15 with the S.W.A.T Team! For this drill, we challenge you to use three fun techniques - Stamp it, Stitch it (machine, hand, or faux), & Spray or Splatter it! 

We can't give a great challenge without a prize! One lucky participant will receive a $10 gift card for 3 Scrappy Boys! 


I love all three of the techniques in this challenge and was THRILLED to use them all on one project! I started by adding brown ink splatters to my cream cardstock base. You can achieve this look over an even mist by removing the cap/nozzle and gently tapping the straw above the areas you'd like to ink. 

After Distressing the edges of two paper squares and adding a few patterned circles, I machine stitched a square to hold all of the pieces together. I love the added texture! 

I finished off the card with stamping! Looks like I did the three techniques in the challenge backwards! I paper pieced the bun and stove and adding it to the center. I grounded the image by cutting a small banner from brown patterned paper. I also stamped the sentiment onto a strip of cream cardstock, cut it up, and arranged it on the card front. Lastly, I embellished the card with a few star wood veneers. 


Thanks for stopping by! Make sure to head over to the S.W.A.T blog to see my fellow design team member's gorgeous creations. Link up your own project by September 28th to be entered for a chance to win! 

SUPPLIES :: A Muse Studio Cardstock & Doily, Lawn Fawn Plus One Stamp Set, Pebbles Walnut Grove 6x6 Paper Pad, Studio Calico Star Wood Veneers & Mister Huey's Dark Calico, StazOn Jet Black Ink

TOOLS :: Close To My Heart Paper Distresser, MyStik Permanent Adhesive, ZIG 2-Way Chisel Tip Glue, Cutter Bee Scissors, Fiskars Scrapbooking Rotary Paper Trimmer, A Muse Studio Acrylic Block, Brother Sewing Machine, Martha Stewart Score Board

Project Life with Practical Scrappers

Friday, September 6, 2013


Good afternoon! So glad you joined me today for another Project Life Feature with Practical Scrappers! Yesterday I shared an introductory post to today's layout. This spread documents a recent ATV trip with my extended family. Our cabin in the Northwoods of Wisconsin brings the whole family together. 


I'm using pocket protectors from American Crafts and Albums Made Easy Kits from We R Memory Keepers. All of the photos were taken with my camera (no cell phone pictures!). 


Love the above photo. It's my dad and his brothers. They like to cut him in half in photos and joke about the pun. Unfortunately, I had a few problems printing off these photos and it looks more like his 1/3 of a brother. Ha! But I just had to document the event! 


The Silhouette Cameo was used in a few spots, such as the 'let's go' cut above. I backed it with faux woodgrain paper to help it standout. The 'trail riding' title was then cut from the same paper.


I used a lot of stitching on this layout, securing sticker letters and adding a border to photos. I really love the extra texture it gave the project. My typewriter also got lots of use on this layout. I typed directly onto the 3x4 card - My Project Life cards from Studio Calico are a little too thick to fit nicely in my typewriter; however, the WRMK cards are thin and perfect! Additionally, I typed some journaling on to white cardstock, cut it into strips, and adhered it to a 4x6 card.


Thanks for stopping by! Make sure to head to the Practical Scrappers blog to see more Project Life inspired posts. 

SUPPLIES :: We R Memory Keepers Memo & Tangerine Albums Made Easy Kits, Ormolu Made Pennants & Little Labels, Simple Stories (SN@P Icons, Letters, & Labels Stickers), BasicGrey (Hey You Flags, Fact & Fiction Chipboard Stickers), Tim Holtz Vial Letters, Chic Tags (Autumn Days Labels, 2 inch Circles Cut File)

TOOLS :: American Crafts Page Protectors, Fiskars Scrapbooking Rotary Paper Trimmer, Tim Holtz Tiny Attacher, MyStik Permanent Adhesive, ZIG 2-Way Chisel Tip Adhesive, Bic Mark-It Ultra Fine Point Black, Brother Sewing Machine, Smith Corona Electronic Typewriter, Silhouette Cameo

Take Me Away...

Thursday, September 5, 2013

Good afternoon, Paper Crafters! My 2013 album sure has been neglected lately... It's the end of summer, life has been busy, and I've lost all my creative mojo. However, I did take some time recently to photograph older spreads in the album, including this title page of sorts. 


I have filled up one 12x12 3-ring album this year and have started filling up a second. The above spread will be the first page of Edition 2, as well as a starting point for several 2-page spreads documenting Memorial Day weekend. I loved how easy it was to place 3x4 photos and cards into the pockets and have a complete page. All the pictures were random leftovers that didn't fit into the other layouts. 

Stop back tomorrow to see the spreads that follow this as part of a Project Life feature with Practical Scrappers!

SUPPLIES :: Becky Higgins Midnight Core Kit, Studio Calico (Valley High & Roundabout Project Life Kits, Winona Add On Kit), American Crafts White Puffy Vinyl Thickers, BasicGrey Hello Die Cuts

TOOLS :: Becky Higgins Design A Page Protectors, StazOn Jet Black ink, Bic Mark-It Ultra Fine Point Black, Close To My Heart Paper Distresser, Fiskars Scrapbooking Rotary Paper Trimmer, Cutter Bee Scissors, MyStik Permanent Adhesive, Martha Stewart 1/2" Corner Rounder

Let's Look Back...

Wednesday, September 4, 2013

I love looking back at the first cards and layouts I created. It can be comical and embarrassing, but there's nothing like it. So why not share it with you too?! 

The layout below was one of my first samples made for Creations Galore, using Crate Paper's Farmhouse Collection. 

Crate Paper scrapbook layout

Crate Paper embellishments

I thought I was so creative using the orange bar code strip as a decorative element. This collection is still one of my favorites. I'll admit, I've been hoarding a few scraps. 

Thanks for taking a walk down memory lane with me today! 

Card Making Tuesday

Tuesday, September 3, 2013

Hello bloggers! I hope you all enjoyed your Labor Day weekend and were able to relax a bit. I took full advantage of the day off, making sure to take a nice mid-day nap! But it's time to get back to work... With that, I have three new cards up on the Creations Galore blog today. If you're local, I'd love for you to stop into the store for Make N Take fun. For more details on how to make the cards or the products used, visit the blog post here.

Peachy Keen Stamps Miss You Card


KaiserCRAFT Sparkle Card


Create dimensional hearts with punches

Thanks for stopping by! Enjoy your Tuesday, friends!
Proudly designed by Mlekoshi pixel perfect web designs