Flowers To Cheer You

Wednesday, July 31, 2013

Good morning! This weekend I found the adorable sketch below on the Retro Sketches blog. As you can see, I'm too late to enter the challenge. But I just had to create a card using the sketch as inspiration! 


And here's the card I created: 

All of the papers are from We R Memory Keepers newest Chalkboard collection. The butterfly was stamped on both vellum and yellow cardstock and paper pieced together.

If you're looking for a starting point for your next project, head over to Retro Sketches for inspiration! 

CARD SUPPLIES
Cardstock: Paper Cut (Via White, Vellum)
Patterned Papers: We R Memory Keepers (Chalkboard)
Stamps: Stamps By Judith
Inks: StazOn (Jet Black)
Punch: Marvy (Scalloped Circle), EK Success (Large Corner Rounder)

Squeeze The Day

Monday, July 29, 2013

Hello! The heat wave has broke and we're enjoying cooler weather, but it's still the heart of summer. Therefore, there's still plenty of time to share summer themed projects!

I had some fun patterned papers left over from a past BoBunny collection. I used them as the background of the card, in addition to paper piecing a few lemons. 

Thanks for stopping by today. I hope you're summer is filled with many bright and happy days!

CARD SUPPLIES
Cardstock: A Muse Studio (Sugar)
Patterned Paper: BoBunny (Sunkissed Skies), Crate Paper (On Trend Swanky)
Stamps: A Muse Studio
Inks: StazOn (Jet Black)

Cards For Your Morning...

Thursday, July 25, 2013

Good morning paper crafters! I have a few cards I created for Creations Galore this past week ready to share with you! 

How adorable are these images from Peachy Keen Stamps?! Love the eyelash detail on the right piece of corn. So cute! I stamped the larger corn stalk on the background paper and layered a flower border to create a fun scene for the two images colored with Copic markers. 

A small tip for working with faces... Color right over them rather than trying to carefully work around them. When the image is colored just right, come back in with the Copic Colorless Blender and push the color outside the lines of the eyes. You can also choose to use an opaque white pen over the colored eyes. My favorite is the Sakura White Gelly Roll Pen

The second card was a quick and easy card using patterned paper. I embossed the sentiment onto a cream strip and adhered it to the card with foam risers! This is my go-to design when I need to make up a quick card for any occasion. 

Thanks for stopping by!

CARD 1 SUPPLIES
Cardstock: Paper Cut, We R Memory Keepers
Patterned Paper: We R Memory Keepers (Country Livin')
Stamps: Peachy Keen Stamps
Inks: Memento (Tuxedo Black), Copic Markers (G03, G05, G17, Y02, Y15, Y17)
Punch: Martha Stewart Crafts

CARD 2 SUPPLIES
Cardstock: American Crafts, Paper Cut
Patterned Paper: We R Memory Keepers (Happy Campers)
Inks: VersaMark Watermark
Embossing Powder: Adirondack (Espresso)

What Was I Thinking?!

Wednesday, July 24, 2013

Good morning! Today I'm sharing a layout posted on the Use It Tuesday blog yesterday. As part of the Use It Tuesday team, I'm here helping you USE YOUR STASH.... and my own! Sometimes I look at a hoarded item and think, "Why in the world did I buy that?!" That brings us to this week's challenge: WHAT WAS I THINKING?!

For this challenge we want you to use your hoarded supplies featuring something that makes you think, "Why did I buy that?" or "Why did I buy that many" or even "WHY did I let my friends take pictures when I did THAT?" 

Then head over to the Use It Tuesday blog and link up your creation by Noon EST on Friday, August 2nd. As always, one lucky participant will be randomly chosen to be a featured guest designer in an upcoming challenge. 

Now, let's take a look at my WHAT WAS I THINKING moment...

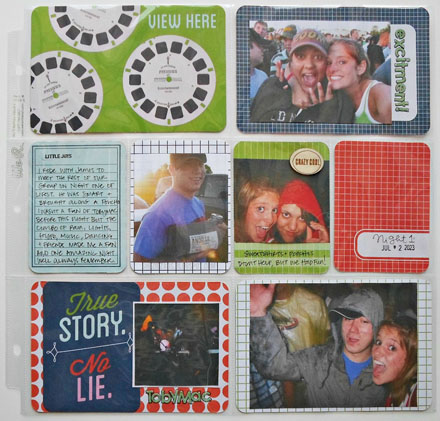
I thought these locks and keys from Graphic 45 were just gorgeous! But the packages sat and sat and sat and sat and collected dust in my pile of embellishments. They're beautiful, but they're not my style. In my mind, a key just never fit in with the theme of any of my layouts. Solution? Come up with a cheesy subtitle for this layout and add the metal embellishments to the page!

The pictures were from a concert I attended downtown with two friends. The keys were strung on ivory twine and hot glued to the page. I glued a bunch of twine behind the lock embellishment to tie the two pieces together.

The chipboard letters that make up the title are a few years old as well. I painted gold Color Shine from Heidi Swaap over the top to highlight the other gold pieces in the page. 

Thanks for stopping by today. I can't wait to see what great moment or item you highlight! 

SUPPLIES
Cardstock: A Muse Studio (Sugar)
Patterned Paper: BoBunny, Crate Paper (Story Teller Cuts 12x12 Accents) 
Embellishments: Chic Tags (Birthday Cake Banners), Graphic 45 (Ornate Metal Keys, Ornate Metal Key Holes), Ormolu (Made Little Labels, Made Flappers), My Mind's Eye (The Sweetest Thing Lavender Stickers)
Twine: A Muse Studio 
Stamp: American Crafts (Dear Lizzy Neapolitan Date Stamp)
Inks: Heidi Swaap Color Shine (Gold), StazOn (Jet Black)

Party Hat :: Copic Time!

Monday, July 22, 2013

Happy Monday! I'm stopping by today to bring you a card with a cute little image from Stampendous. 

It had been a while since I pulled out my Copic markers and enjoyed some stress-free coloring. This image was too adorable to pass up! I didn't trim close to the body in order to keep the motion doodles. To add structure to the image, a kraft oval was placed behind it. 

Thanks for looking! Have a wonderful week!

SUPPLIES
Cardstock: American Crafts, Paper Cut (Kraft), Copic X-Press It Blending
Patterned Paper: We R Memory Keepers (Storytime)
Stamps: Stampendous (Cling Party Hat Kiddo)
Inks: Memento (Tuxedo Black), Copic Markers, Sakura Gelly Roll Pen (White)
Die: Spellbinders (Classic Ovals Small)

COPIC LIST
Blues: BG01, BG05, BG07
Greens: G21, YG63, YG67
Reds: R02, R08
White: W-1, Colorless Blender
Skin: E000, E00, E01, R20
Hair: E13, E15, E17

Drill #12 :: Sketch With A Twist

Saturday, July 20, 2013

Good morning! I'm back today with a drill from S.W.A.T. Today's challenge combines a sketch from our very own Lanette and patterned paper. That's right... We don't want to see any solid cardstock used in this layout! 


Well... That's where I failed just a bit. I had most of the layout completed, when I realized I really needed somewhere for the eye to rest. That's when I added a few white embellishments cut from white cardstock and the white cardstock matting the yellow patterned paper. It wasn't until I took a photo of the finished piece that I realized what I had done! Forgive me! 

I flipped the sketch horizontally and added a few extra photos. Rather than having a physical circle behind the photos, I placed a black pen in the holes of my Martha Stewart Circle Cutter and created doodles. I added a few pieces of cork washi tape from the Studio Calico's July PL Kit. This may be my new favorite product!

Thanks for stopping by, and don't forget to check out the rest of S.W.A.T's Design Team projects! While you're there, link up your own Sketch with a Twist project to be entered to win a Webster Pages Grab Bag! I can't wait to see what you create!

Hello My Dear

Tuesday, July 16, 2013

The finishing touches have been made to my nephew Hunter's baby album, at least in terms of his grand entrance into the world and his first few days. The last layout to be constructed was this one of my sister-in-law's parents meeting Hunter for the first time. 

These square cutouts from Studio Calico were the starting point for the layout. From there, I layered patterned papers and other embellishments in the same color scheme. 

The SMASH Date Stamp from K&Company is one of my most used tools. The open box is perfect for journaling a word in a different color ink. To balance out the amount of red located at the bottom left corner of the layout, I added the word "love" in red pen to the box.

Not much journaling was needed as many of the layouts in this album were from the same event. Therefore, I added the word "grandson" to an arrow die cut from Chic Tags to complete the page.

Thanks for stopping by today!

LAYOUT SUPPLIES
Cardstock: American Crafts
Patterned Paper: Studio Calico (Temple), October Afternoon (Paid In Full), BasicGrey (Fact)
Embellishments: American Crafts (Dear Lizzy Neapolitan Buttons & Accents, 5th & Frolic Large Tags), K&Co (SMASH Date Stamps), Chic Tags (Birthday Cake Labels)
Inks: StazOn (Jet Black), Bic Acid-Free Markers

Unscripted Sketches #219 :: First Home

Monday, July 15, 2013

Hello! I hope everyone had a wonderful weekend! I'm sharing a new sketch from Unscripted Sketches with you today! 


This week, I rotated the sketch and placed the half circle (doily) on top of the rectangle (vellum). I added a few more rectangles and these cute stamps, embossed in black and colored with Tombow Markers. 

We'd love to take a look at your own creation using this week's sketch as inspiration. Link up at Unscripted Sketches for a little blog love and a chance to be featured in the Top 3. 

CARD SUPPLIES
Cardstock, Vellum: Paper Cut
Stamps: Peachy Keen Stamps
Inks: Memento (Grey Flannel, Tuxedo Black), VersaMark Watermark, Tombow Markers
Embossing Powder: Ranger (Black Super Fine Detail)

Father of the Year Layout

Wednesday, July 10, 2013

Good afternoon! Let's start today's post with a little confession: I love Jurassic Park. You may remember a post discussing my trip to see the giant T-Rex from the movie in Time Square last summer. Therefore, I was ridiculously excited for the release of the movie in 3D for its 20th anniversary. My dad, being the awesome guy that he is, took me and my roommate to see it. Poor guy had to take a nap before the movie so he'd stay awake that late! haha I couldn't help but document the entertaining evening. 

I used the Clippings Collection by BasicGrey for this layout. All of the papers matched the colors in my picture of the movie theatre perfectly. Because the page focused on my dad and his desire to support my nerdy enjoyments, I wanted the page to have a more masculine feel.

In addition to BasicGrey papers and embellishments, I added a few things from Ormolu, Chic Tags, and this adorable paper clip from K&Co.

I found this ticket sticker from Hampton Art and wanted to incorporate it into the project. Since three of us went, I cut matching letters from white cardstock with the Silhouette Cameo and layered them onto the page. I added more stars like the one printed on the ticket by adhering a few gold star sequins that were included in a recent Studio Calico Project Life Kit. 

Thanks for checking out today's project! Do you ever document your favorite movies or tv shows?

LAYOUT SUPPLIES
Patterned Paper: Basic Grey (Clippings 12x12 Paper Pad, Fact 12x12 Paper Pad)
Cardstock: A Muse Studio (Sugar)
Embellishments: BasicGrey (Clippings Element Stickers & Alphabet Stickers, Hello Die Cuts), Hampton Art (Little Things Cardstock Stickers), Studio Calico (Star Sequins), Chic Tags (Birthday Cake Banners), Ormolu (Made Pennants, Little Labels), K&Co (Retro SMASH Clips)
Tools: Silhouette Cameo, Close To My Heart (Paper Distresser)

Use It Tuesday :: Birthdays

Tuesday, July 9, 2013

Hello there! Use It Tuesday's newest Design Team has posted their first challenge, and I'm so excited to announce I will be joining them for another term! 

This challenge is all about BIRTHDAYS! With America celebrating its independence recently, we wanted to encourage you to get out your birthday themed hoarded items to celebrate! 

 
Here's the fun card I created for the theme! The bubblegum machine stamp was so adorable, but I was never sure how to use it! Birthday's are sweet, so it worked well! Other hoarded items on this card are the ribbon and paper scraps. Love when I can combine the scraps of other projects to create something new!

Thanks for stopping by! Now head over to Use It Tuesday to see my fellow Design Team members and their gorgeous projects! Then link up your own birthday themed project... We can't wait to see what you create!

SUPPLIES
Cardstock: Bazzill Dots, Paper Cut, Copic X-Press It Blending Card
Patterned Paper: A Muse Studio
Stamps: Stamps By Judith
Inks: Copic Markers, Memento (Tuxedo Black)
Ribbon: A Muse Studio

On Trend :: Metallic Gold

Monday, July 8, 2013

Hello paper crafters! It's time for the On Trend Team of Practical Scrappers to bring you a new trendy technique for you to try. Today it's GOLD, baby! I love this current trend to add pops of metallic and shine to projects! 

I created the above layout, first laying down a background of gold paint splatters with Heidi Swapp Color Shine. The Color Shine was also used to color the cardstock arrows that were cut with the Silhouette Cameo. You can add just a hint of metallic in this way, coloring a title, paper flower, or other mistable embellishment.

For my title, I added a Dear Lizzy sticker. It was a little large for the space. So I folded each edge twice to create a dimensional banner. While searching for stickers and accents to layer on the page, I came across this gorgeous gold frame from Crate Paper. It added a third splash of gold without overwhelming the design. 

Thanks for stopping by. Head over to the Practical Scrappers blog to check out more GORGEOUS GOLD inspiration from the rest of our On Trend Team!

LAYOUT SUPPLIES
Cardstock: American Crafts (White), A Muse Studio (Sugar)
Embellishments: American Crafts (Dear Lizzy Neapolitan Sticker Sheet), Crate Paper (The Pier Ephemera Pack)
Ink: Heidi Swapp (Gold Color Shine), ZIG Writer (Black)

S.W.A.T Drill #11 :: Neon

Saturday, July 6, 2013

Hello paper crafters! I'm back with Drill #11 from S.W.A.T, and you're going to love it! The challenge is to fill your page with lots of NEON! It's popping up everywhere, from clothing to scrapbooking. 

This Drill's sponsor is Boys Rule, who have generously donated an Elle's Studio prize pack to one lucky winner who links up to the S.W.A.T blog by July 28th! 

I had this funny photo of my best friend, Anna, and I on a trip to Chicago last summer. The colors and style of the photo were completely different from the rest of the trip. It didn't fit in any other layout I created. This challenge was the perfect time to do something fun with it. 

I started with a plain white background, giving the eye a resting point from the bright colors I pulled together. Next, I started layering on a collection of stickers, brads, and rhinestones from different manufacturers. 

I finished up the layout with a title cut with the Silhouette Cameo and a font on my computer. The font is Quigley Wiggly, and you can download it for free here.

Thanks for stopping by! I can't wait to see how you incorporate the neon trend into your scrapbooking. Remember to link up by July 28th!

LAYOUT SUPPLIES
Cardstock: American Crafts (White), A Muse Studio (Onyx)
Patterned Paper: Echo Park (Hello, Amazing), Crate Paper (Maggie Holmes Tags)
Embellishments: American Crafts (Amy Tangerine Sketchbook Fabric Stickers, Dimensional Stickers), BasicGrey (Lauderdale Stitched Brads), Echo Park (Everyday Eclectic Element Stickers)
Stamps: Market Street Stamps
Ink: Memento (Tuxedo Black), Studio Calico (Mister Huey's Sherbet)

Scrapbooking with the Albums Made Easy System

Friday, July 5, 2013

Good afternoon! I hope all of you had a wonderful Independence Day! I'm back today with a few red, white, blue, AND GREEN layouts using We R Memory Keepers Album Made Easy System

I'll be teaching a Project Life/Albums Made Easy Workshop at Creations Galore soon. You can see my full calendar of classes here. To prepare for the class, I created a few new samples to show the students various techniques. I couldn't help but share with you all one of those samples. 

In college, a group of my friends and I would travel to a summer music festival held in July every year. For about 6 years in a row, we camped out for 5 days and rocked our faces off. I chose to create a traditional layout with a group picture.

I used several of the Albums Made Easy journaling cards from the Memo collection on the layout. In fact, the green cardstock matting the photo and the 12x12 white cardstock are the only papers that are not journaling cards! It was easy to layer them onto the page. I even cut the date tab off the top of one card and used the remainder of it for the red strip in the top left corner. The paper triangle in the same spot and the strip on the bottom right corner are a cut up 4x6 journaling card as well. 

After the traditional layout, I chose to use the We R Memory Keepers photo sleeves to document the individual days. I plan to use one side for each day. This sleeve documents the first day, which actually was only tent setup and a night concert. This year I arrived late and missed the set up (no pictures). But it rained and rained and rained. It was fun to finally document these memories in a fun way. 

I never scrapped these photos, because I wasn't sure how I wanted to document so many pictures from 5 days of events! This really helped me break up the different parts of the day. I have several "titles" and journaling spots. Each pocket has potential to be a mini layout with a new idea, but keeping it in the same color scheme helps unify the entire spread. With their pre-made "kits" (I used Memo), the guess work of color and patterns is eliminated! 

 You'll notice the date here... OOPS! This really is a sample for Creations Galore to hang on the wall of the store. I wanted to show off the awesome date stamps from American Crafts; however, they didn't go back far enough (These pictures are from 2007). When I come back for the samples, I'll just place a new, correct date over them! 

I tried to keep the embellishments simple, deciding to add a single Studio Calico wood veneer and a few BasicGrey sticker letters. For this project, you really only NEED photos and a journaling pen. If you choose to make your photos a little smaller than the pockets (like I have) add adhesive to your list. Easy as can be! And fast too!

Thanks for checking out today's project... If you're in the Green Bay, Wisconsin area, I would love for you to attend one of my upcoming classes. Have you tried out any pocket page protectors in your scrapbooking?

Red, White, & Blue

Wednesday, July 3, 2013

On the Practical Scrappers blog today, the design team is sharing beautiful red, white, and blue projects! Whether you're a patriotic American or looking to mix your cool colors with your warm, we've got something to inspire you! 

I couldn't help but make a Fourth of July card after picking up these adorable paper flags from We R Memory Keepers. After adhering the sentiment to the card front with foam risers, I added a little Glossy Accents to the flag stick and set it in place. The Glossy Accents dried in seconds, making this a simple card to throw together!

I hope you have a great Fourth of July... Don't forget to head over to the Practical Scrappers blog to see more paper crafting inspiration!

CARD SUPPLIES
Cardstock: Paper Cut
Patterned Paper, Embellishment: We R Memory Keepers
Stamp: Northwoods
Ink: StazOn (Jet Black)

Unity Challenge :: Love Birds

Tuesday, July 2, 2013

Hello paper crafters! Unity Stamp Co has three new challenges up on their blog with great prizes up for grabs. I L-L-L-LOVE Unity red rubber cling stamps, and I think you should too! 


One of the challenges included the card sketch above. Triangle corners, like the one shown above, have been popping up in cards and scrapbook pages. Janna Werner is beyond inspiring and often uses paper triangles in the corners of her projects. As much as I love the look, I have been hesitant to try it for myself. Therefore, I forced myself to dive right in and give it a go. Here' my take on the sketch:


I'm using one of my favorite Unity Stamps... You may have recognized it from a recent post. I created my own banner with patterned paper by folding a long strip of paper and cutting triangles out of each end. 

Stop by the Unity Stamp Co Challenge blog today to link up your own project to one of the three challenges. You have until July 17th to be entered! 

CARD SUPPLIES
Cardstock: A Muse Studio (Sugar, Wasabi)
Patterned Paper: Studio Calico (Love Wins), GCD Studios (Melody Ross Collection)
Stamps: Unity Stamp Co (Love Birds)
Inks: Memento (Rich Cocoa), Heidi Swaap Color Shine (Gold)
Pearls: A Muse Studio (Sugar)
Tools: Close To My Heart (Paper Distresser)
Proudly designed by Mlekoshi pixel perfect web designs