Showing posts with label birthday. Show all posts

Card Making Monday : Happy Birthday

Monday, August 25, 2014

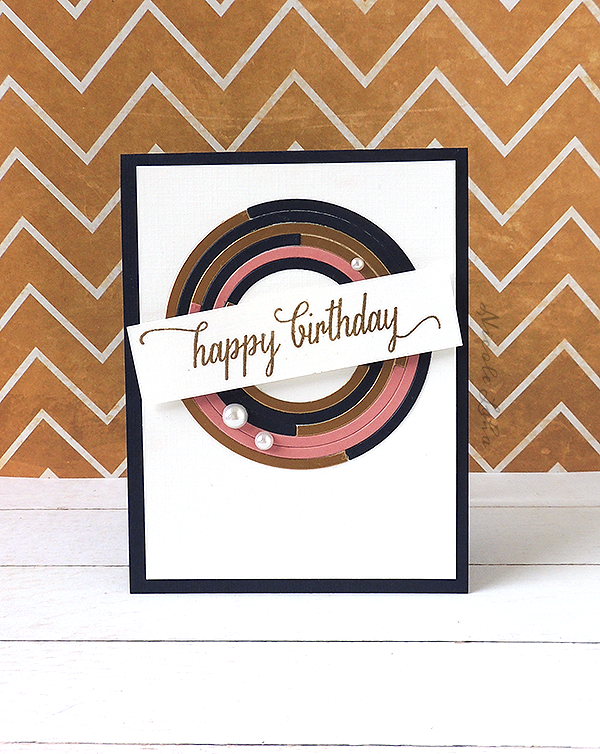
One of my favorite card makers is JJ Bolton. I'm constantly inspired by her great ideas, and this card is no exception. For today's post, I created a card using her rings of gold as inspiration. 

Paper Smooches Rainbow Die
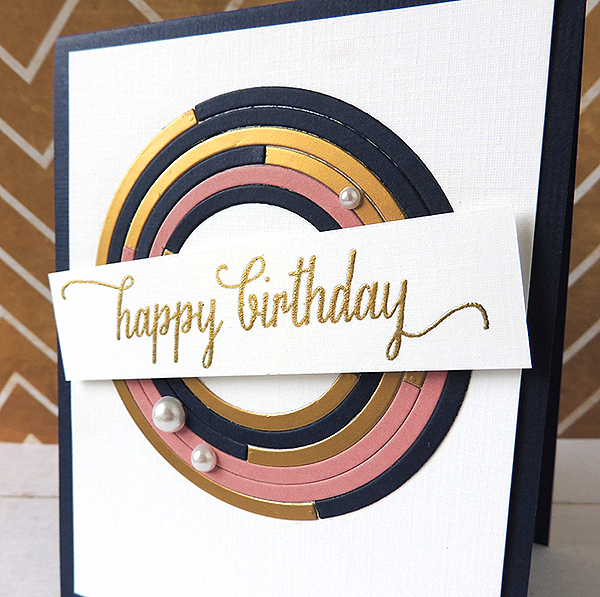
The rings were cut from gold, pink, and dark blue cardstock using the Paper Smooches Rainbow die. I started with the two largest pieces, adhering them in place to create a full circle. It was easy to fit the smaller pieces into place from there. I made sure none of the seams connected to create a graphic element. To finish the card, I heat embossed the sentiment in gold and added a few pearls.

Paper Smooches Rainbow Die
This experiment has me looking at dies in a new way. Who would have thought this card was created with a rainbow die?! 

SUPPLIES :: Paper Cut Cardstock / Melissa Frances White Pearls / Hero Arts Stamp Set / Ranger Princess Gold Embossing Powder / VersaMark Watermark / Paper Smooches Rainbow Die

Use It Tuesday :: Birthdays

Tuesday, July 9, 2013

Hello there! Use It Tuesday's newest Design Team has posted their first challenge, and I'm so excited to announce I will be joining them for another term! 

This challenge is all about BIRTHDAYS! With America celebrating its independence recently, we wanted to encourage you to get out your birthday themed hoarded items to celebrate! 

 
Here's the fun card I created for the theme! The bubblegum machine stamp was so adorable, but I was never sure how to use it! Birthday's are sweet, so it worked well! Other hoarded items on this card are the ribbon and paper scraps. Love when I can combine the scraps of other projects to create something new!

Thanks for stopping by! Now head over to Use It Tuesday to see my fellow Design Team members and their gorgeous projects! Then link up your own birthday themed project... We can't wait to see what you create!

SUPPLIES
Cardstock: Bazzill Dots, Paper Cut, Copic X-Press It Blending Card
Patterned Paper: A Muse Studio
Stamps: Stamps By Judith
Inks: Copic Markers, Memento (Tuxedo Black)
Ribbon: A Muse Studio

Birthday Fun

Thursday, June 6, 2013

Today I have a few spreads to share with you all relating to my father's surprise 50th birthday party. His birthday was on the same day the world was expected to end, which would have made for a convienent "over the hill" party. However, my dad's the type of guy to embrace old age. He's really looking forward to that senior citizens discount. This guy is all hobbies - fishing, hunting, building all kinds of things for me, fixing cars - Retirement will be anything but boring and bland. He's teaching me contentment and joy. With an exciting life, a loving family, and a good head on his shoulders, how could a guy not celebrate 50?! It was that attitude that caused us to decorate in bright colors - the same colors featured in BoBunny's Surprise Collection. I grabbed most of the collection in anticipation of documenting this fun event. 

I used a Project Life Design A photo sheet for the smaller details of the party and included two traditional 12x12 layouts to highlight the bigger moments. I love using a combination of protectors to create custom albums that work for me. 

Unfortunately, Green Bay was hit with a massive snow storm the day of the party. I can't believe I even made it to work, where the party was to be held. We would have closed the shop, since most of town was closing anyway, but we had to stay open for the surprise to work! The whole thing made for an interesting afternoon of preparation and execution. I'm so grateful for the friends and family that braved the weather and came out to celebrate with us. 

I used a lot of cut outs and chipboard embellishments to decorate the two pages.

There was an emotional and sentimental moment that evening that I wanted to journal about and capture, but didn't want out for the everyday eye to behold. Therefore, I adhered a kraft pocket to the outside of one of the photo sleeves and included my journaling and an additional photo. 

And I can't leave out the two 12x12 layouts I created...

I felt so bad for my momma - The cake turned out to be nothing like what she ordered, but it was delicious and served its purpose! 

Combination of paper stickers and chipboard accents from BoBunny and felt and fabric embellishments from BasicGrey were used to add lots of different textures to the layout.

The cake was a 4x6 cutout from a patterned piece of paper from BoBunny. I added the sticker alphas, stitching, and doodles.

Lastly, we have the gift opening. He opened quite a few gifts that evening, but this was by far his favorite. A good friend gave him a baby pacifier. The series of pictures captured his reaction perfectly, and it screamed to be documented! 

The 'remember' die cut was created with the Silhouette Cameo, and a variety of sticker alphas were used to complete the title. 

Thanks for stopping by the blog today! 

Sketch It :: Milk It

Monday, February 25, 2013

It's time for another sketch from the great challenge blog, Unscripted Sketches. I'll be honest, this week's sketch had me stumped. Take a look at it here: 


I decided to flip the sketch upside down. After playing around with several stamps and papers, my card evolved into this:

It's not exactly like the original sketch. But that's the wonder of a sketch... I say it almost every week. With Unscripted Sketches, we want to see what you come up with using the sketch as a starting point of inspiration. Link up your project here. 

CARD SUPPLIES
Cardstock: American Crafts, Paper Cut
Patterned Paper: American Crafts, We R Memory Keepers
Stamps: Market Street Stamps
Inks: Memento (Tuxedo Black), Copic Multiliner
Punches: Martha Stewart Crafts

Super Secret Birthday Blog Hop

Thursday, January 24, 2013

Happy HAPPY birthday to Jessica of KinderStampO! We're celebrating with a super secret blog hop! Here's the card I created for Jess:

You can find the doily and flowers in KinderStampO's online store. I love all of their gorgeous trims and embellishments. The flowers were cut off their wire stems and hot glued onto the card front along with some patterned paper and faux stitching. 

For joining in the birthday fun, we're giving one lucky winner a $25 gift card to the KinderStampO store! To be entered into the drawing, be sure to comment on each blog post. You're headed to Amanda's blog next, but here's a full list in case you get lost.


Nicole Laha (me!)

 Thanks for stopping by... Jess, have the most wonderful birthday!

CARD SUPPLIES
Cardstock: A Muse Studio (Sugar)
Patterned Paper: Pink Paislee, American Crafts
Doily, Flowers: KinderStampO
Inks: Memento (Tuxedo Black), ZIG Writer (Black)

I dare you not to smile...

Tuesday, December 4, 2012

Hello blogland! I received some wonderful news this morning... I was selected as a Trigger Target at Moxie Fab World. Woo hoo! I love their challenges. They have a new one up on their blog today, so head over and enter yourself! If you've found yourself on my blog through Moxie Fab, I thank you for stopping by. It's so wonderful to be able to share my love for paper crafting with people all over the world... and to see what you're working on to! 

I must be on a circles kick lately, because here's another card I created with a scattered circle background. I've had this ADORABLE hippo stamp from Stamps By Judith for a bit now... It's a new release stamp. Judith has come up with coordinating stamps, like a gun holster and cowboy hat, but I wanted to stick with just him today. And after seeing this fun BoBunny patterned paper, I had to make it into a birthday card! 

I stamped the hippo onto Copic X-Press It cardstock and colored him in with Copic markers. I didn't want to hide the image; therefore, I stamped the sentiment on vellum with black embossing powder. After studying the card a few minutes, I would love to make another rendition... Maybe with the hippo holding a balloon. I'll work on it and get back to you ;)

Hope this guy has made you smile as much as he did for me today!

CARD SUPPLIES
Cardstock: Paper Cut (White, Orbit Orange, Leaf Green Felt), American Crafts (Lagoon)
Patterned Paper: BoBunny (On The Go Gears, On The Go Argyle)
Vellum: Paper Cut (29 lb)
Stamps: Stamps By Judith (Large Hippo Critter)
Inks: Copic Markers, Memento (Tuxedo Black), Versamark Watermark
Embossing Powder: Ranger (Super Fine Detail Black)
Punches: Marvy (2", 2 1/2"), EK Success (1 1/2")
Adhesive: MyStik (Permanent Vellum)

COPIC MARKER LIST
C-3, C-5, C-7

Happy Robot

Thursday, November 1, 2012

Hello! I hope you survived the Halloween festivities. I had the great pleasure of working the face painting booth at my church for Harvest Fest, a fun, indoor, and safe event for children. We all ate way too much candy, played lots of games, and inked up our faces and hands! 

Now it's back to work, and I'm here today with a fun card using A Muse Studio's Love Machines Stamp Set. The card is clean and simple but full of fun! I stamped the robot in blue ink on the card base, 3.5" x 5". I cut a smaller piece of cardstock, 3.25" x 4.75", stamped the sentiment, and used a punch to create a circle. Adhering the cardstock to the card base with foam risers adds dimension and creates a window for him to peek through.

What do you think of clean and simple cards? 

CARD SUPPLIES
Cardstock: A Muse Studio (Sugar)
Stamps: A Muse Studio (Love Machines)
Inks: Memento (Tuxedo Black), Adirondack (Sailboat Blue)

Sketch It Saturday: Robo Birthday

Saturday, September 29, 2012

Hello friends. It's another Sketch It Saturday with Unscripted Sketches. Want to play along? Use the sketch below as inspiration when creating a card, layout, or project. Then head over to Unscripted Sketches to link up with us. You just might be featured the next week!

I added some Distress Ink and faux stitching to the edges of my papers. 

The chipboard buttons were self adhesive: doesn't get any easier than that to add some cute embellishments! The star is a grungeboard piece with embossed harlequin pattern. To add color, I rubbed a brown pigment ink pad along the star. The juicy foam let the ink get into all the flat surfaces. Next, using a flat die pad, I lightly added black ink over the top. The black ink stuck only to the raised pattern. 

In the rearranging of my craft room, I've misplaced my nice Cutter Bee scissors. So this cute image from Market Street Stamps is not as clean as he should be. I'm just not a fan of using an x-acto knife, so I sit and whine with a big, clunky scissors in my hand! We're so spoiled sometimes!

I hope you've enjoyed my take on today's sketch. Make sure to head over to Unscripted Sketches to see what the rest of the design team cooked up! Those girls are crazy talented. I love being apart of such a great team!

CARD SUPPLIES
Stamps: Market Street Stamp (RoboLove), A Muse Studio
Inks: Distress Ink (Vintage Photo), StazOn (Jet Black), A Muse Studio (French Roast)
Ribbon: A Muse Studio (Onyx Dot Sheer)
Star: Tim Holtz Grungeboard Elements Harlequin
Patterned Paper: DCWV
Cardstock Card: Paper Cut (A-7 White)

Golden

Thursday, March 29, 2012


Earlier this week friends and family surprised me with a wonderful party celebrating my golden birthday. Gold accents, special people, and delicious food made the night perfect. Here are just a few of my favorite snapshots from the memorable evening..

I was conveniently wearing a GOLD chain! 
Even little A. had a great time, fascinated by all the balloons and fringe.

Mustache favors made for great photo ops. 


I've been blessed with some truly great people to surround me, encourage me, and beat me in Charades.

Sparkle

Thursday, November 17, 2011

Who doesn't love cake and glitter?


I wanted to try out the glitter from A Muse studio with the Quickie Glue pen and sure enough, it was a fast and easy technique that added some glitz to this birthday card. I'm constantly amazed at the strong hold of the Quickie Glue. When I first came across the pen, I was truly skeptical. Permanent glue from a ball point pen?! I just had to try it with glitter, small die cuts, and heavy rhinestones. When the rhinestone couldn't be shaken off the paper, I was hooked. It's my go-to pen for all things tiny. It works best with glitter, as you can create fine lines and lays flat -- unlike thick tacky glue.


I love the glitter on this card so much I'm tempted to send it to myself! 

Create one too:
Ink- Memento Tuxedo Black
Copics- BG10, RV14, Y19
All other products A Muse Studio
Cake Stamp from A Very Merry Un-Birthday Set
Sentiment from Contemporary Greetings Set
Paper- Sugar, Onyx, Sky, Bubblegum Polka Dot
Glitter- Diamond
Proudly designed by Mlekoshi pixel perfect web designs