Project Life Update : Week 12

Wednesday, April 30, 2014

Good afternoon! It's been cold and rainy this week, leaving me with only one option: hibernate in my craft room catching up on 2014's Project Life album. I took photos today of Week 12 to share with you all, documenting March 19th to March 25th. 

This spread includes: 10 cell phone pictures, 5 camera pictures, 1 screenshot, 1 web photo, and 1 hotel key envelope.

What happened this week: Cold temperatures, dog sitting, grocery shopping, the Malaysian plane went missing, and a work scrapbooking retreat.

I used my computer and the font, Traveling Typewriter, to create most of the journaling.

I returned my hotel room key but kept its paper envelope. It was a great way to include my room number and the resort's logo and address without adding more journaling. Plus! I can't help but add little bits of hoarded memorabilia into the pockets. 

I had extra photos and some personal journaling, so I cut a piece of white cardstock, folded it in half, and created an interactive element. There are actually two of these in this week's spread. To decorate the journaled part of the flip, I added a small strip of washi tape. 

This week was packed full of photos and contained minimal embellishments... And that's ok with me! It's weeks like this one that make this project manageable. 

SUPPLIES :: Studio Calico Project Life Kits, Printable Labels / Becky Higgins Midnight & Jade Core Kits, Paper Cut White Cardstock

TOOLS :: Becky Higgins Design A Page Protectors, 0.1 & 0.5 Marker, Date Stamp / Tim Holtz Tiny Attacher / StazOn Jet Black / HP Photo Printer

Scrapping Our Stash : April Blog Hop

Friday, April 25, 2014

Welcome to April's Scrapping Our Stash Blog Hop with Practical Scrappers! You should have found your way here from Brenda's blog. If not, make sure to head over to the Practical Scrappers blog to find a full list and start from the beginning. You're in for lots of inspiration! 

For this month's project, I pulled out a few pieces from BoBunny's Enchanted Collection. This collection is a few years old and is absolutely gorgeous - Black and white and glitter all over! For this layout, only a small portion of the patterned paper peeks through the layers, but it was just enough.

Bride Wedding Layout
The pictures are of the most darling of brides, a dear friend of mine. They cried to be the main focal point; therefore, I tried to create a minimalist layout. The doilies, a never-ending supply in my stash, added texture without overpowering the page. I promise I can sew in a straight line, but I went for a messy look, adding an additional layer of dark grey thread. 

Bride Wedding Layout
Thanks for hopping along... And thank you to Glitz Photography for the pictures of my gorgeous friend! Your next stop is Susie's blog with more Stash Scrappin fun! 

SUPPLIES :: Paper Cut White Felt Cardstock / We R Memory Keepers Bewitched Chipboard Alphabet / BoBunny Enchanted Patterned Paper / White Paper Doilies / Studio Calico Mister Huey's Leaf Green Color Mist

TOOLS :: Tim Holtz Paper Distresser / Tonic 12" Guillotine / MyStik Permanent Adhesive / Brother Sewing Machine

Picture Perfect Scrapbook Layout

Tuesday, April 22, 2014

Today you'll find me posting on the Creations Galore blog using We R Memory Keepers Notable Collection to document a picture of some crazy lady at a concert.......... So I'm the crazy lady. And it was fun. Hop over to the CG blog to see more pictures and a supply list. 

Notable We R Memory Keepers Layout

Card Making Monday : True Friends

Monday, April 21, 2014

Each Monday, I create three new cards and coordinating Make N Take kits for Creations Galore. Today was no exception, and I chose to get a little messy... 

Gelatos Masking Technique


Avery Elle Petals and Stems Card
The technique for this card actually just LOOKS messy. It was my first time using gelatos, and I'm hooked!

Gelatos Masking Technique
I created a mask for the clean, white rectangle center, adding images and splatters over it. Before stamping the image, I added gelatos directly to the stamp and misted it with water. A few splatters of Glimmer Mist added another layer of color. Once dry, I lifted the mask and stamped this beautiful sentiment in black ink. 

Avery Elle Petals and Stems Card
A simple but breathtaking technique!

SUPPLIES :: Paper Cut White & Black Linen Cardstock / Avery Elle Petals & Stems / JustRite Friendship Vintage Labels Seven / Tattered Angels Gold Glimmer Mist / Faber-Castell Tropical Gelatos / Memento Tuxedo Black Ink

TOOLS :: Water Mister / Tonic 12" Guillotine / MyStik Permanent Adhesive / Scor-Pal / Acrylic Block 

Hippo Birdie!

Saturday, April 19, 2014

Good afternoon! Are you having a great Saturday? Today I'm sharing a quick card using Lawn Fawn stamps. 

I can't get enough of Lawn Fawn's adorable images and recently picked up this stamp set. I stacked the stamps on the set to create the party scene, coloring the images with my favorite Copic markers. The coordinating sentiment is just too perfect!

Thanks for checking out today's project!

SUPPLIES :: Lawn Fawn Year Four Stamp Set / Paper Cut Cardstock / We R Memory Keepers Game Day Patterned Paper / Copic Markers / Memento Tuxedo Black Ink / Sakura White Gelly Roll Pen

Project Life Update : Week 11

Wednesday, April 16, 2014

It's Wednesday, which means it's time for another Project Life update. Man, I'm loving this project. It's become so simple to get all those memories documented. Today I'm sharing Week 11, which follows March 12th through March 18th. 

This spread includes: 5 cell phone pictures, 3 camera pictures, 1 shower invite, 1 flyer, 3 web photos, and 1 concert ticket. 

What happened this week: Became accidentally hooked on Downton Abbey, my bedroom curtains fell on my head, attended a close friend's bridal shower, found a new favorite comedian, drank lots of coffee, played with Sweet Stamp Shop's new release, enlisted a child helper at work, enjoyed a concert and an award winning movie. 

This poor title card. I originally put the marks on the wrong dates - of a week already completed of course - and I tried to save it. I'm just so in love with this card (from the Studio Calico Office Hours Project Life Kit)! 

I created a 3x4 template in Photoshop this week to print out all of my journaling. This helps me gather all of my thoughts and makes sure I can get everything onto one card. While the typewriter is great for exact placement of the words, the computer excels with the delete button! Oh how hard life must be when the biggest decision is which piece of technology I'd like to use. ha!

I discovered Attach Me Stickers from BasicGrey this past winter while creating my December Daily album, and they're still one of my favorite accessories. It's so easy to add things to the album. Here I've added an invite and a flyer with the ticket adhered to the back. 


If you're curious about that journaling card on top, it's a quote from Chris Porter about Starbucks. My bestie, who works at the famous coffeehouse, and I had a good chuckle. 

Rather than cover up the photos with my usual white label, I printed captions onto a piece of vellum. They were cut down and adhered to the photos with my favorite tiny attacher. 

That's a wrap on Week 11. Another one in the books! How are your Project Life albums coming along this year?

SUPPLIES :: Studio Calico Project Life Kits, Office Hours 4x6 Paper Pad / Becky Higgins Midnight Core Kit / Pebbles Journaling Cards / Paper Cut Vellum / BasicGrey Attach Me Stickers

TOOLS :: Becky Higgins Design A Page Protectors, White Leather 12x12 Album, 0.1 & 0.5 Marker, Date Stamp / Tim Holtz Tiny Attacher / StazOn Jet Black / HP Photo Printer

DIY Easter Egg Decorations

Wednesday, April 16, 2014

Hi Everyone! The weather here in Wisconsin looks like Christmas, but I've been going crazy with the Easter decor inside. It's going to be a fortress of Spring.

DIY Floral Easter Eggs
Most recently, I've been filling bowls and jars with plastic eggs decorated with my scrappy supplies. You can check out the floral and pearl eggs I created on the Creations Galore blog today where I'm showing a quick tutorial. Click here to see the full how-to.

DIY Decorative Easter Eggs
Floral Easter Egg Tutorial
You can also see a tutorial for these glitter eggs by clicking here. I'm not sure which set I love more! 

Glitter Easter Eggs

Loads Of Love :: Paper Piecing with Sweet Stamp Shop

Tuesday, April 15, 2014

Hi there! Today's project is full of pastels and love. Aww.... 

Loads of Love Card by She Zig Zags
I just can't get enough of the images in this stamp set by Sweet Stamp Shop. I paper pieced the image using a combination of patterned paper and cardstock. The background was created with chalk ink and my favorite heart stamp. 

Paper Piecing
To contrast this adorable card, I have something I don't love... Snow in April. I shared this photo on Instagram yesterday, and we received even more today! Go away, ok?! 

Wisconsin Snow
Thanks for stopping by! I hope the weather where you are is sunny and warm. 

CARD SUPPLIES :: Paper Cut Cardstock / American Crafts Patterned Paper / Sweet Stamp Shop 'Press It Wash It' Stamp Set / Memento Tuxedo Black / VersaMagic Aquatic Splash

Card Making Monday: Cheers To You

Monday, April 14, 2014

Happy Monday! This morning I gathered all of my card making supplies and then sat down at my computer to find a fun sketch for today's project. After finding the mother of all card sketches on the Retro Sketches blog, I got to work. 


I stayed true to original sketch, choosing not to change the orientation or design. 

The diagonals were easy to create with my paper trimmer. I chose to cut just the blue and orange piece, layering them on top of a yellow square piece. The orange cardstock was embossed for added texture! 

Thanks for checking out today's card. Enjoy your week!

SUPPLIES :: Paper Cut White Cardstock / American Crafts Orange Cardstock / We R Memory Keepers Hip Hip Hooray Collection / Sweet Stamp Shop Stamp Set / Memento Tuxedo Black Ink / Marvy Matchables Orange Ink / Yellow Baker's Twine

TOOLS :: Lifestyle Crafts Embossing Folder / Vagabond Machine / Glossy Accents / Tonic Guillotine 

Documenting The Details

Thursday, April 10, 2014

Good morning! You can find me posting on the Creations Galore blog today sharing how I created this fun picture documenting the contents of my makeup bag. I used the picture to create a 6x8 insert for my Project Life album (seen in yesterday's post). I'd love for you to stop by and take a look! 

Project Life Update : Week 7

Wednesday, April 9, 2014

Yesterday I took the day off and focused on my Project Life album. There were several weeks that had minor missing pieces, making the overall album incomplete. If you've been keeping track of my weekly sharing of the album, you've noticed I've skipped around a bit. This week is no exception, going back in time to share week seven. There was an insert I wanted to include, but I kept forgetting to print the extra large photo. We'll get to that, but first let's take a look what happened in this spread documenting February 12th - February 18th. 

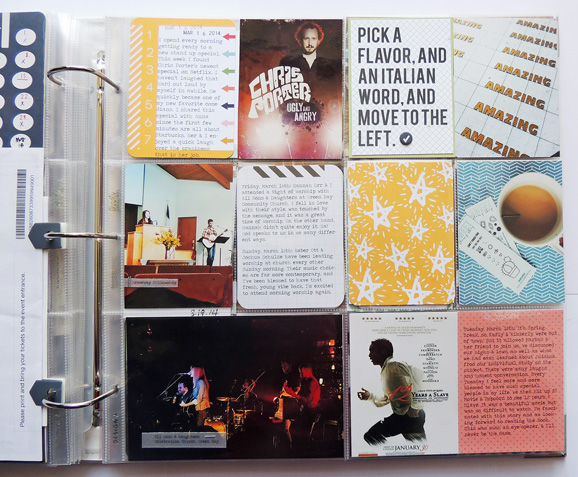
This spread includes: 5 cell phone pictures, 1 camera photo, 2 screenshots, 1 shopping bag, 1 wedding invite, 3 web photos, and 1 business card. 

What happened this week: Haircut, shopping, makeup consultation, coffee love, olympic obsession, the polar vortex continued, a snow storm, and journaling on family and life.

This week had two references to the weather. I almost wish I had waited to document more of the polar vortex as we rose higher on that record list above with plenty more days below 32. We're into April and here in Wisconsin we're still not above 50 degrees. I chose to add the screenshots and embellish with the year and vellum hearts rather than complain one more time about how cold it was.

This week I had an appointment at Sephora which motivated me to open up my makeup bag, scatter the contents onto a 12x12 piece of white cardstock, and photograph it. Numbers were added next to each product using Photoshop before I printed it in a 6x6 size. 

I used my typewriter to add product information and slipped it into a 6x8 page protector. I love that the pages from Becky Higgins' new 6x8 album size fit perfectly into the 3 ring albums. Yay for more insert choices! I cut a coordinating piece of patterned paper and slipped it into the protector rather than adding additional photos or journaling. 

Our television was on the olympic coverage the entire week, so I made sure to include a few things. I found the logo, the US uniforms, and a tweet of some of the crazy conditions that made headlines. 

I also added to pieces of memorabilia. First was the reception information to a friend's wedding. It was a nice alternative to white cardstock helping to document the process of designing and assembling her invitations. A vellum die cut and wood veneer were attached to one side. I'm planning to include the actual invite as an insert in the actual week of her wedding, so I didn't mind covering up most of the information here. Lastly, I added a business card from a quick haircut. I'm pretty picky about who touches my mane. But this week, I needed a trim and I needed it now. So I got one at the mall in no time at all. I'm not sure I'll ever have the courage to do it again, so it needed a spot in the album. 

Thanks for checking out this week's Project Life Update. So much going on in this week's spread... Hope you found some inspiration to keep documenting your days! 

SUPPLIES :: Studio Calico Project Life Kits, Printable Labels, Wood Veneers / Becky Higgins 4x6 Grid Cards / Paper Cut White Cardstock / K&Company SMASH Tape Black Dots, Paper Clips / Simple Stories SN@P Labels

TOOLS :: Becky Higgins White Leather Album, Design A Page Protectors, 6x8 Page Protector, 0.3 Marker, Date Stamp / StazOn Jet Black Ink / Tim Holtz Tiny Attacher / Typewriter
Proudly designed by Mlekoshi pixel perfect web designs