Sketch It Saturday :: Rocking Horse Card

Saturday, December 29, 2012

Hello and happy Saturday! It's time for a new sketch from Unscripted Sketches


I realllly stretched this week's sketch. But that's what sketches are for, right? For inspiration. Feel free to take the sketch and flip it, rotate it... just mix it up! And don't forget to link up at Unscripted Sketches so we can give you a little blog love. We'd love to see what you create! 

CARD SUPPLIES
Cardstock: Paper Cut, American Crafts
Patterned Paper: BasicGrey
Stamps: KaiserCraft
Ink: Memento (Tuxedo Black)
Punches: Marvy

Runway Inspired :: New Year Card

Thursday, December 27, 2012

Hello! I hope you all had a wonderful Christmas holiday. Mine was full of people I loved and food that was delicious!! I'm truly blessed. But I'm back to work and here with a new card to share. Today I'm playing in the Runway Inspired Challenge, using this gorgeous dress as inspiration. I love these colors! 


For my card, I pulled together than great chartreuse color and some navy. The dress has a subtle shine to it, so I incorporated some gold foil and sequins into the card.

It's not too late to join in this challenge... Head over to their blog to link up your own project. Thanks for stopping by today!

CARD SUPPLIES
Cardstock: A Muse Studio (Navy, Wasabi, Sugar, Kraft)
Patterned Paper: DCWV (Tradewinds Stack)
Doily: KinderStampO (5 inch)
Stamp: Market Street Stamps (Essential Holiday Elegance)
Ink: Memento (Tuxedo Black)
Sequins: A Muse Studio (Gold)

Sketch It Saturday :: Noel

Saturday, December 22, 2012

Good morning! It's time for Sketch It Saturdays with Unscripted Sketches. I'm so glad you've joined me today! Our Design Team has put together some fantastic projects using this weeks sketch that you just have to see! After you've seen my project, head over to the US blog to see what everyone else whipped up! Here's a look at this week's sketch:


I flipped the sketch to create the holiday card below:

In addition to flipping the sketch, I replaced the background rectangle with a doily and made my sentiment more narrow than what was called for. Rather than squares, I cut out three snowflakes using an A Muse Studio die and sprayed them with Splash! ink. In fact, they were the "stencils" I used for this card

Of course, every project needs a little bling. I added black pearls, gold sequins, and faux stitching to complete the card.


Hope you've enjoyed today's creation. We'd love to see your take on the sketch. Link your creation by Thursday, December 27th to get a little blog love and possibly be featured on the Unscripted Sketches blog!

CARD SUPPLIES
All A Muse Studio
Cardstock: Kraft, Winter Sky, Navy, Sugar
Stamps: Vintage Holiday Greetings
Inks: Memento (Tuxedo Black), Splash! (Winter Sky), Sakura Gelly Roll Pen (White)
Die: Snowflakes Trio Die Set
Bling: Pearls (Black), Sequins (Gold)
Extras: Paper Doilies (4.5")

Holiday Cheer Blog Hop

Thursday, December 20, 2012

Hello, and welcome to the 
KinderStampO Guest Design Team 
"Holiday Cheer" Blog Hop!

That's right, in the upcoming months, you'll find me posting as a guest designer on the KinderStampO blog. I am so excited to share my creativity with you... We have lots of fun projects, challenges, features, and surprises in store for you. I'm so honored to be a part of it!

For those of you new to my blog, I am Nicole, a single gal living in Green Bay, Wisconsin. I'm anything but a morning person; therefore, you'll find me crafting late at night with coffee in hand. I fell in love with paper crafting about 3 years ago and mostly create cards. However, I take far too many pictures and enjoy scrapbooking as a way to preserve those memories.

For today's blog hop, we're bring you holiday cheer in the form of a project that's red, white, black, and gold. Here's the card I created:

This card was so easy and fun to make, that I made quite a few to give away this Christmas. KinderStampO has great trims, stamps, and DOILIES! As you can see, I couldn't resist placing an elegant doily onto this card! For the sentiment, I used KinderStampO's Say It In Type set. This clear, alpha stamp set is so versatile - Create any sentiment you wish! I finished off the card with some fun washi tape and gold sequins. So fun!

For joining in today's blog hop, we have a holiday gift just for you... Head over to the KinderStampO store, and take 10% off all items!
Use coupon code: holidaycheer

We also have a great giveaway!!
A stocking valued at over $100 worth of KinderStampO products.


There's lots of ways to enter:
Leave a comment on this blog post
Become a friend of KinderStampO on Facebook
Follow the KinderStampO Store
Follow the KinderStampO Blog

Your next stop on the hop is CallyAnn!

Here's a full list of the KinderStampO Guest Designers, just in case you get lost along the way. Thanks for stopping by!

Nicole Laha (me!)
Vanessa Wachlin

CARD SUPPLIES
Cardstock: A Muse Studio (Sugar, Cherry), Paper Cut (Black Linen)
Washi Tape: K&Co Smash Tape (Black Dots)
Stamps: KinderStampO (Say It In Type)
Inks: Memento (Tuxedo Black)
Doily: KinderStampO (5 inch Doily)
Sequins: A Muse Studio (Gold)

Sweet Christmas Wishes

Wednesday, December 19, 2012

Good afternoon! Last night I found some extra time to hop into my craft room and make a few Christmas cards. I always like to check out any challenges before I get started and came across this great sketch from Mojo Monday


Rather than three identical images, I chose to break them up, as well as changed the placement of the ribbon. What do you think?

The sentiment was stamped on cream cardstock and adhered to the card base, bordered by dark brown. I had some extra candy cane striped cardstock and wanted to use it before the Christmas season is over! I stamped the gingerbread people onto kraft paper and decorated them a bit. The long strip of satin ribbon was adhered to green cardstock with double sided tape in order to extend over the card base. The twine was then wrapped around the card, and I hid the twine's knot behind the large bow!

Hope you've enjoyed today's card... Thanks for stopping by! I have another great announcement with you tomorrow morning, so please stop back :)

CARD SUPPLIES
Cardstock: A Muse Studio (Cherry, Kraft, Vanilla, French Roast, Wasabi)
Patterned Paper: A Muse Studio (Candy Cane Stripe)
Stamps: A Muse Studio (Candy Cane Wishes)
Inks: Copic Marker (R29), Sakura Gelly Roll Pen (White), Memento (Tuxedo Black)
Ribbon: A Muse Studio (Satin Cherry, Baker's Twine Cherry)
Extras: Copic X-Press It Double Sided Tape (1/4")
*For A Muse Studio products, please visit my webstore.

To all a good night... A special announcement!

Tuesday, December 18, 2012


Hello paper crafters! I have some fun news to share with you today! You can now find me designing for the A Muse Studio Challenge Blog! We have some great inspiration, challenges, and prizes for you in the coming year! The first challenge will be in January, and you'll want to join in! Make sure to head over to follow the blog to stay updated. 

To celebrate the announcement, I'm sharing a fun card I created using A Muse Studio products!

To create the background for this card, I cut out three snowflakes from scrap paper using an A Muse Studio die. After arranging the snowflakes on a piece of white cardstock, I sprayed the entire piece with Sky Splash!, a spray ink that coordinates with the A Muse Studio line of colors. I can't wait to try the spray on flowers, ribbons, and other embellishments!

After the spray dried, I stamped the image and sentiment, added some baker's twine, and adhered it to the card base with foam risers. To add just a little extra sparkle, I added Diamond glitter to each of the stars on the card with the Quickie Glue Pen.

If you're looking for some last minute Christmas card ideas, here's one! It was super simple and fast to create! Thanks for stopping by today, and I look forward to sharing more A Muse Studio ideas with you!


CARD SUPPLIES
All A Muse Studio
Cardstock: Sugar, Cherry
Stamps: Santa's Flight
Inks: Memento (Tuxedo Black), Splash! (Winter Sky)
Die: Snowflakes Trio Die Set
Baker's Twine: Cherry, Onyx
Glitter: Diamond
Extras: Silver Jingle Bells (9mm)

Sketch It Saturday :: The Altered Circle Challenge

Saturday, December 15, 2012

Happy Saturday! It's time for another challenge at 
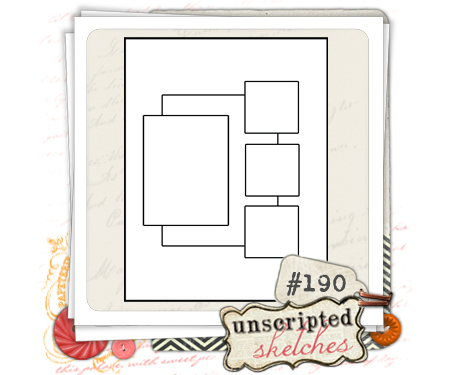
Unscripted Sketches! Along with the sketch, it's also the piggyback challenge. This challenge is do something to or with the circle in the sketch. Alter is somehow - distress it, tear it, layer it - Make the circle a unique focal point. 


For my card, I flipped the sketch and altered the design a bit. This is a great reminder from us to you -- The sketch is just a starting point to inspire you. We hope you'll take that sketch and run with it, creating cards, layouts, or 3D projects. 

The stamps are from a Market Street Stamps set called Christmas Bells. I've loved this bow stamp (by Brenda Weaver) from the moment I saw it released. I remember seeing a card Brenda created with the set, coloring the bow green. I didn't want to take another look at her creation before creating my own, as it might stunt my creativity. As I began writing this post, I went to search out the card on Brenda's blog to reference here today. Wow was I stunned. I must have subconsciously remembered more of the card than I thought, or her and I had similar ideas for this stamp. You must take a look. I almost cried looking at her card, as it looks like I copied the whole thing! Right down to the placement of the sentiment and the rounded corners! Wow, wow, wow. I almost didn't want to post this card, but the US post is already up! Have any of you come across this before?! I was so proud of how gorgeous this card turned out, and now I'm slightly embarrassed.

But let's move on to how I created the card... I stamped the bow onto white cardstock, re-inked the stamp, and stamped again onto a second piece of cardstock. To line up the bow, I turned over my circle punch, centered the bow, and punched away! 

The image was colored with Copic markers. I started by coloring the image on the circle. As I came to a piece that extended off the circle, I colored the other image, making sure the shading on both pieces was consistent and coloring only what would be seen beyond the circle. I outlined the entire image with E50. During my Intermediate Copic Certification, there was a large discussion about outlining images vs creating realistic shadows. I don't think our class ever fully agreed, but I always like outlining my images with a light color. Once the images were colored, the circle was adhered using foam risers. I didn't alter the circle in any way described in the challenge today; however, the circle truly is a unique focal point on the card!

After this part was finished, I noticed the Copic blues and my cardstock were not the exact color. Therefore, I added a second layer of kraft to separate them. Just that little change, and it works! I rounded a few corners, added some bling, and adhered a sentiment to the card base to balance out the raised circle. The stamp set comes with several different sentiments that I thought about stamping onto the card base as well. Maybe for the next card I create with this set... It's far too pretty to put away just yet! 

Thanks for stopping by... Make sure to view the rest of our lovely design team's inspiration on the Unscripted Sketches blog!


CARD SUPPLIES
Cardstock: Paper Cut
Stamps: Market Street Stamps (Christmas Bells)
Inks: Memento (Tuxedo Black), Copic Markers, atyou Spica Glitter Pen (Clear)
Bling: Queen & Co (Classy Red Pearls)

COPIC LIST
Bow: B41, B32, B45
Bells: Y00, Y11, Y21, Y26
Outline: E50
Berries: R24, R59
Leaves: G21, YG63, YG67

Joy To The World

Friday, December 14, 2012

Hey there! This is my second post for the day... If you're looking for the snowflake Christmas card, keep scrolling! In this post, I'm playing along with the Tuesday Trigger at Moxie Fab World. 

I had seen this photo last week when the trigger was first posted and wasn't sure how I could pull together a card with a monochromatic, neutral color combo. 


But here's what I came up with!

I started out by pulling together some cream and white cardstock. Then I discovered this patterned paper by Reminisce and a lightbulb turned on! The medallion stamp from JustRite was stamped with gold ink and embossed with clear powder. The sentiment was then stamped with brown ink to add a little contrast. JustRite and Spellbinders have teamed up to create dies that coordinate with their beautiful stamps. Here I layered the medallion dies, attaching the white piece with foam risers. 

I love the elegance of this card. Thank you for the push to create, Moxie Fab World! There's still a few days to join in the challenge yourself.. Head over to the MFW blog to link up!

CARD SUPPLIES
Cardstock: Paper Cut (Cream, White)
Patterned Paper: Reminisce (Tiptoe Through the Tulips)
Stamps: JustRite (Joy to the World Medallion Labels)
Dies: Spellbinders (Nested Oval Medallion Labels)
Inks: Encore! (Gold), Memento (Rich Cocoa), Versamark Watermark
Embossing Powder: Ranger (Clear)
Ribbon: Offray (Lady Chiffon White)
Bling: Queen & Co (Sunflower Yellow)

Merry Christmas

Friday, December 14, 2012

Good morning! Tomorrow I'm hosting my first A Muse Studio workshop. We'll be creating two cards and a tag, including this fun card below...

The card layout was found on the A Muse Studio website, and I made a few changes. How great is this color combination for Christmas - red, kraft, light blue, white, and wasabi?! So whimsical and fun! After adhering strips of color to the card base, I wrapped cherry baker's twine around the front and tied a bow. The kraft circle is 1-7/8" and I used the Martha Stewart Circle Cutter to create it. I have to say, this cutter has quickly become one of my favorites. Punches are convenient and may take a few seconds less; however, the circle cutter saves on space! I find myself reaching for one tool rather than digging through a drawer of punches to find the right size. 

I recently bought the Snowflakes Trio Die Set from A Muse Studio, and you'll see it used in plenty of upcoming projects. Each snowflakes has a unique look and size. I've used the middle sized die for this card, adhered it to the kraft circle, and topped it off with a black pearl. The circle and sentiment are both attached to the card base with foam risers. I finished off the card with these fun pearl sequins. A Muse Studio offers several different colors, and I just had to pick up a pack of each! I never thought of using sequins as a card embellishment, but I'm loving the look now that I have. They're not as heavy as buttons and not as elegant as pearls -- just perfect for this card!

Thanks for checking out today's project! For more information on my upcoming workshops, visit me here.

CARD SUPPLIES
All A Muse Studio
Cardstock: Wasabi, Sugar, Sky, Kraft
Patterned Paper: Candy Cane Stripe
Stamps: Essential Sentiments
Ink: Memento (Tuxedo Black)
Die: Snowflake Trio Die Set
Bling: Sequins (Pearl), Pearls (Black)
Baker's Twine: Cherry

Kindred Spirits

Thursday, December 13, 2012

Good morning! Today I'm sharing a colorful card sure to brighten anyone's day. At least I'm hoping it will brighten yours. 

I used lots of A Muse Studio products on this one... the stamps, papers, and ribbons all came from this delightful company. What a great job (it sure doesn't feel like one) to be able to play along with these great products and bring them to you! One of my favorite A Muse Studio items is the satin ribbon. I love how big and beautiful the bows turn out. And of course, no card is complete with a touch of baker's twine. 

The sentiment was stamped on a flag I created out of yellow cardstock. I adhered the piece to grey cardstock and cut around it, creating an outline. 

The stamps I used were meant to work together - a black outline with a colored inside. For this card I decided to try something new by stamping them individually and using them as separate components. It's an interesting look. What do you think?

Thanks for stopping by my blog today!

CARD SUPPLIES
All products A Muse Studio
Cardstock: Onyx, Lido
Patterned Paper: Grass Dot, Lido Venetian
Stamps: Kindred Spirits
Inks: Grass, Cherry, Memento (Tuxedo Black)
Ribbon: Cherry Satin
Baker's Twine: Onyx

Holiday Hoopla

Wednesday, December 12, 2012


There's a big sale going on at A Muse Studio - Lots of items 30% off, including ribbon, paper, stamps, and more! But you must hurry, the sale ends Sunday, December 16th at 11:59pm Eastern. 

A card to warm your heart... and fill your stomach?!

Tuesday, December 11, 2012

The temperatures have dropped, everyone I know seems to have a cold, and all I want to do is stay inside where it's warm. With that said, this card could not be more perfect for the times!

The pot was first embossed onto a cream colored vellum. I didn't want to take away from the gorgeous patterned papers by adding a solid cardstock. I embossed the pot image a second time on cream paper and pieced it onto the original image. MyStik's permanent vellum adhesive was used to adhere the vellum to the front of card. I love how you can fearlessly use vellum with this adhesive... Can't see a single strip of it!

Thanks for stopping by today... I hope it's a SOUPER one!

CARD SUPPLIES
Cardstock: Paper Cut (Black Linen, Whip Cream)
Patterned Paper: Bo Bunny (Serenade Dot, Promenade, & Poppies)
Vellum: Paper Cut (Cream)
Stamps: Market Street Stamps (Comfort Food)
Inks: Versamark Watermark
Embossing Powder: Ranger (Super Fine Detail Black)
Adhesive: MyStick (Permanent, Vellum)

Burlap Love :: Christmas Card Edition

Monday, December 10, 2012

Hello! I picked up this Christmas set last year from MSS but just a bit too late to use them for my cards. Therefore, they were the first ones I grabbed when creating my cards this year. I wanted to create a few holiday greetings with a more masculine feel for some guy friends. Here's to hoping they'll appreciate them and not toss them in the same piles as their junk mail! 

I started by stamping the Bits of Burlap background stamp on sugar cardstock with brown ink. When pulling together the colors and stamps, I didn't realize the irony of adding actual burlap to the card front.

Thanks for stopping by tonight!

 CARD SUPPLIES
Cardstock: A Muse Studio (Sugar, Cocoa, Navy, Evergreen)
Stamps: Market Street Stamps (Bits of Burlap, Essential Holiday Elegance)
Ink: Memento (Rich Cocoa)
Brads: Graphic 45 (Stamped Metal Brads)

Sketch It Saturday :: Enjoy The Season

Saturday, December 8, 2012

Hello! It's Sketch It Saturday with Unscripted Sketches. Our Design Team has done it once again with great cards to inspire you. Head over to the blog to see what they've created and to link up your own project. Here's this week's sketch and my take on it:


For this card I used a BasicGrey embossing folder to add some texture to the white cardstock piece as well as die cut some leaves. I also added some black ink around all the pieces. The holly leaves were cut from glitter paper by American Crafts and are GORGEOUS. However, without the inked edge, it was hard to see the individual shapes. 

I colored the ornament and bow about 12 different ways with different mediums in different colors and was unsatisfied. In fact, I was just frustrated with the overall card. I finally decided that I wanted less. Less color, less jazz. Therefore, I colored in some elements with red and let the white shine.

Thanks for stopping by and don't forget to head over to Unscripted Sketches!

CARD SUPPLIES
Cardstock: Paper Cut (White, Deep Blue Hopsack), Fossil
Glitter Paper: American Crafts
Stamps: JustRite
Inks: Memento (Tuxedo Black), Copic Markers, We R Memory Keepers (Sweetheart Inker Black), Sakura Gelly Roll Pen (White)

Create Your Own Gift Tags :: Glitter Love

Friday, December 7, 2012

Hello blogland! I received some great winter and valentine themed products from A Muse Studio yesterday. I was too busy last night preparing for a ladies tea and cookie exchange that I didn't get to play with all the fun supplies until tonight! Here's the first thing I created with the winter items:

All of the stamps and papers are currently 30% off at A Muse Studio! And this tag will be one of three projects I'll be offering in my December Workshop next Saturday. You can find out more information about my workshops by clicking here.

This tag is actually a 2-1/2" x 4-1/2" piece of Sugar cardstock. To transform it from just a piece of cardstock to a traditional tag, I cut the top corner off the right hand side. Then I placed the scrap triangle on the opposite corner as a cutting guide to ensure both sides were exact.  

How gorgeous is this even layer of glitter?! Replicating this technique is far easier than it looks! Just place a strip of 1/4" Scor-Tape onto the tag base like this:

After lifting up the tape backing, sprinkle diamond glitter over the area, tap off the excess, and use a paint brush to sweep away any stray flecks. The end result is stunning! 


To create the bottom half of the tag, cut a separate 1-1/2" x 2-1/2" piece of cardstock. Place more strips of Scor-Tape onto the piece and peal off the backing. I cut 6- 1/2"x 2" strips, but you could cut any size and quantity. Place the strips diagonally onto the cardstock base. Trim ends and adhere to the tag.

I used the Vintage Holiday Greetings stamp set which offers a few different sayings and stamped them in cherry ink. 

For a matching tag reinforcement, cut a circle from cherry cardstock using a 1/2" punch. After adhering it to the tag, use a smaller punch to create a hole through the circle and the tag base. Insert some fun baker's twine in matching cherry, and you have a gorgeous tag to add to your gifts, cards, or scrapbook pages.

I hope you've enjoyed today's project. Thanks for stopping by. 

CARD SUPPLIES
All products A Muse Studio {visit my webstore before Dec 16th for 30% off these supplies}
Cardstock: Sugar, Kraft, Wasabi, Sky, Cherry
Patterned Paper: Candy Cane Stripe
Stamps: Vintage Holiday Greetings
Ink: Cherry 
Baker's Twine: Cherry
Glitter: Diamond

Clean & Simple

Thursday, December 6, 2012

Good morning! Today I'm sharing a card created for a friend who is moving far far away to pursue her dreams. I'm so happy for her and yet so sad to see her go. It's not a highly decorated card, but sometimes those are the best kind!

I cut the flags separately and couldn't believe how perfectly they turned out. I'll probably never be able to do that again! The inspiration for this card came from the Paper Smooches Designer Drafts. I love using card sketches as a starting point!

Thanks for stopping by today! 

CARD SUPPLIES
Cardstock: Paper Cut (White, Fossil, Jellybean Green), American Crafts (Mediterranean) 
Patterned Paper: BasicGrey (Strudel)
Stamps: Inkadinkado
Inks: Memento (Bamboo Leaves)
Brads: Gary M. Burlin (White Mini)

I dare you not to smile...

Tuesday, December 4, 2012

Hello blogland! I received some wonderful news this morning... I was selected as a Trigger Target at Moxie Fab World. Woo hoo! I love their challenges. They have a new one up on their blog today, so head over and enter yourself! If you've found yourself on my blog through Moxie Fab, I thank you for stopping by. It's so wonderful to be able to share my love for paper crafting with people all over the world... and to see what you're working on to! 

I must be on a circles kick lately, because here's another card I created with a scattered circle background. I've had this ADORABLE hippo stamp from Stamps By Judith for a bit now... It's a new release stamp. Judith has come up with coordinating stamps, like a gun holster and cowboy hat, but I wanted to stick with just him today. And after seeing this fun BoBunny patterned paper, I had to make it into a birthday card! 

I stamped the hippo onto Copic X-Press It cardstock and colored him in with Copic markers. I didn't want to hide the image; therefore, I stamped the sentiment on vellum with black embossing powder. After studying the card a few minutes, I would love to make another rendition... Maybe with the hippo holding a balloon. I'll work on it and get back to you ;)

Hope this guy has made you smile as much as he did for me today!

CARD SUPPLIES
Cardstock: Paper Cut (White, Orbit Orange, Leaf Green Felt), American Crafts (Lagoon)
Patterned Paper: BoBunny (On The Go Gears, On The Go Argyle)
Vellum: Paper Cut (29 lb)
Stamps: Stamps By Judith (Large Hippo Critter)
Inks: Copic Markers, Memento (Tuxedo Black), Versamark Watermark
Embossing Powder: Ranger (Super Fine Detail Black)
Punches: Marvy (2", 2 1/2"), EK Success (1 1/2")
Adhesive: MyStik (Permanent Vellum)

COPIC MARKER LIST
C-3, C-5, C-7

My Weekend In Pictures

Monday, December 3, 2012

Happy Monday. It's time to round up the pictures on my phone and share them with you fine folks. Here's what I've been up to....

I put up my Christmas tree, spent 2 days moving around ornaments until I got it just right, and hung a kissing ball. Who wants to come over and be the first to try it out?

P.S. There's a box full of lights and other decor that still needs to be hung, as well as a wreath thats just leaning against my door. hahahaha oh my... Note to self: Purchase door hanger. 

I spent some night-time hours at work preparing for the week ahead. It was just me, some good tunes (a combo of Elvis Presley Christmas and Mumford & Sons Babel), and that gorgeous Vagabond. Yay Tim Holtz... thank you for making my life pretty and so much easier.

I had some fun wondering around downtown (just a few blocks from my humble abode) with my dear friend, Anna, and roommate, Rachael (wait... how'd they get out of the photographs?!) checking out the shop windows decorated for the holidays. Check out this awesome and extremely blurry photo of me attempting to fly:

We eventually settled into Chefusion, a wonderful bar and lounge where we indulged in cheese platters, creme brulee, and live jazz music:

Somehow we also packed in a improv comedy show that night as well. I was laughing far too hard to even think about taking a pictures... Good work players

Finished up the weekend with a metro ride, church, and a nap during the Packers half time show.

I'd say that's one full, delightful life. How was your weekend?
Proudly designed by Mlekoshi pixel perfect web designs