Showing posts with label Winter. Show all posts

Winter Cards with Plum Poppy Studio

Thursday, December 19, 2013

Recently I shared some fall themed cards created with Plum Poppy Studio stamps. I was so excited to get my hands on more of the stamps and quickly went to work creating with the Let It Snow and Ornaments stamp sets. 

Snowman Card / Plum Poppy Studio
For the first card, I used the Let It Snow stamp set. I can't get over how adorable this snowman is! He was paper pieced together with matching red and gray cardstock. The 'let it snow' phrase was stamped on the patterned paper before the ribbon and snowman were added. 

Snowman Card
The cute tree image on the second time is also from the Let It Snow stamp set. I couldn't help but paper piece it together as well... I'm addicted to fussy cutting! The simple outline of the trees allows for endless creative possibilities - color it in, stamp a design onto it, or fill it up with buttons and bling! 

Christmas Card (via shezigzags.blogspot.com)
The tree was adhered to a cut out tag from the BasicGrey 25th & Pine collection. I instantly fell in love with the large sentiments in the Ornaments collection and wanted to use them on this card. Of course, that was after I had layered everything onto the card front. Not quality planning, folks. But that's the fun in creative adventures, right?! I simply inked the oversized sentiment with black ink and stamped it onto the patterned paper and doily. I'm giddy about the result and can't wait to send the card! 

Paper Pieced Christmas Tree
It's not too late to get your hands on Plum Poppy Studio stamps... You can even get a heads start on next year's Christmas cards! Check out her online store and blog for high quailty stamp and cutting files, along with lots of inspiring projects. 

CARD ONE SUPPLIES :: Paper Cut Cardstock, Webster Pages Patterned Paper, Memento Tuxedo Black Ink, Scrapbook Adhesives 3D Foam Squares, Glitter Ribbon from Citrus Twist Scrapbook Kit

CARD TWO SUPPLIES :: Paper Cut Cardstock, BasicGrey Patterned Papers, Memento Tuxedo Black Ink, Theresa Collins Enamel Dots, Studio Calico Button, A Muse Studio Onyx Bakers Twine & Doily

Card Making Monday

Monday, November 4, 2013

Happy Monday! I'm back with two new cards I created as Make N Takes for Creations Galore. If you're local, I'd love for you to stop in and create these fun cards for yourself! 

First up, is this card the most adorable papers from Echo Park. Who doesn't love a little, I mean a lot, of pie on Thanksgiving?!

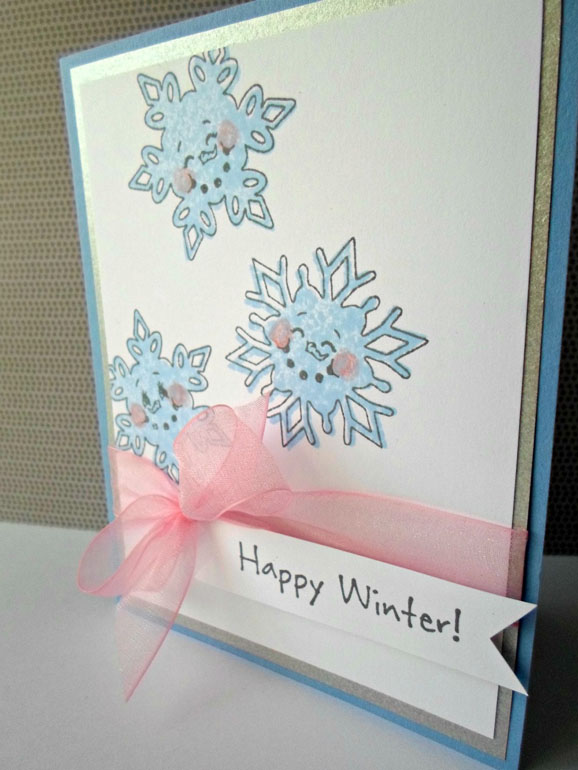
Next we're enjoying winter snowflakes using a Peachy Keen stamp set. These faces are beyond adorable. The border and solid image were stamped with different colors of ink. The cheeks were then added with pink colored pencil to match the large bow. 

Enjoy your week Paper Crafters!

On Trend :: Snow Themed Layouts

Monday, January 14, 2013

Last week the temperatures here in Wisconsin rose and the sun came out, melting most of our gorgeous snow. Then the temperature dropped drastically last night, turning all the water to ice. What a deadly, ugly combination. Luckily, the On Trend Team is showing off some beautiful snow themed projects on the Practical Scrappers blog today. You're sure to be inspired to add some snow to your next layout or card! Here's the page I added to the post:

I'm currently pulling together old photos and creating an album of life highlights. One of the highlights is this great trip with "the boys" ice fishing. The card ride to the lake and back was nothing short of ridiculous fun, and I think these photos show off a bit of that. 

I chose these bright papers to bring out the green and red in the photos and added blues and yellows to keep it from appearing too Christmas themed. This entire trip was exciting and adventuresome, so I didn't want muted blues and purples that usually appears in winter themed layouts. Color can play a huge role in the mood of your page. 

The snowflakes were cut with A Muse Studio dies out of white cardstock. They seemed to get lost on the paper. Therefore, I brought attention to them by outlining them with a marker and adding a black pearl to the centers.

All of the papers used on this page are from paper stacks. As you can see below, I wasn't too careful when tearing out the background page. Unfortunately, I didn't notice the small tear until I had several pieces permanently adhered to the page. To rescue the piece, I adhered a small strip of coordinating paper behind the background paper to complete the corner. After adding a few embellishments, you can hardly notice the mistake! 

Thanks for stopping by today. Don't forget to head over to the Practical Scrappers blog to find even more snow themed inspiration! 

 LAYOUT SUPPLIES
Patterned Paper: BasicGrey (Fact 12x12 Paper Pad), DCWV (Mainstreet Stack)
Cardstock: A Muse Studio (Sugar)
Dies: A Muse Studio (Snowflake Trio)
Bling: A Muse Studio (Black Pearls)
Marker: Bic Acid Free Ultra Fine (Black)
Embellishments: BasicGrey (Fact & Fiction Die Cut Transparencies)
*You can find A Muse Studio products in my webstore.

Sketch It Saturday :: Noel

Saturday, December 22, 2012

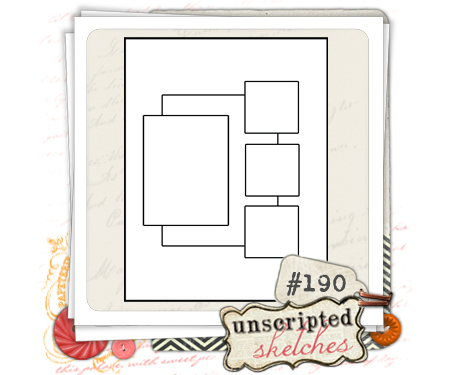
Good morning! It's time for Sketch It Saturdays with Unscripted Sketches. I'm so glad you've joined me today! Our Design Team has put together some fantastic projects using this weeks sketch that you just have to see! After you've seen my project, head over to the US blog to see what everyone else whipped up! Here's a look at this week's sketch:


I flipped the sketch to create the holiday card below:

In addition to flipping the sketch, I replaced the background rectangle with a doily and made my sentiment more narrow than what was called for. Rather than squares, I cut out three snowflakes using an A Muse Studio die and sprayed them with Splash! ink. In fact, they were the "stencils" I used for this card. 

Of course, every project needs a little bling. I added black pearls, gold sequins, and faux stitching to complete the card.


Hope you've enjoyed today's creation. We'd love to see your take on the sketch. Link your creation by Thursday, December 27th to get a little blog love and possibly be featured on the Unscripted Sketches blog!

CARD SUPPLIES
All A Muse Studio
Cardstock: Kraft, Winter Sky, Navy, Sugar
Stamps: Vintage Holiday Greetings
Inks: Memento (Tuxedo Black), Splash! (Winter Sky), Sakura Gelly Roll Pen (White)
Die: Snowflakes Trio Die Set
Bling: Pearls (Black), Sequins (Gold)
Extras: Paper Doilies (4.5")

Merry Christmas

Friday, December 14, 2012

Good morning! Tomorrow I'm hosting my first A Muse Studio workshop. We'll be creating two cards and a tag, including this fun card below...

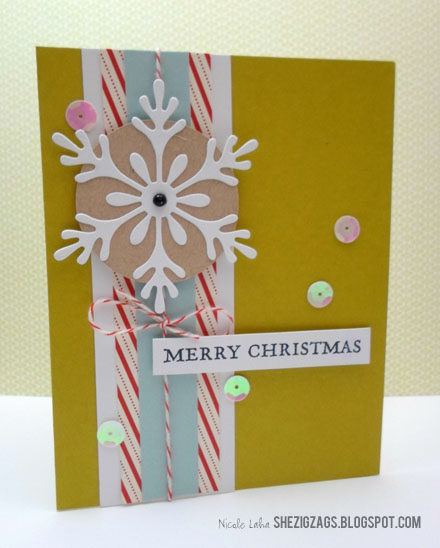
The card layout was found on the A Muse Studio website, and I made a few changes. How great is this color combination for Christmas - red, kraft, light blue, white, and wasabi?! So whimsical and fun! After adhering strips of color to the card base, I wrapped cherry baker's twine around the front and tied a bow. The kraft circle is 1-7/8" and I used the Martha Stewart Circle Cutter to create it. I have to say, this cutter has quickly become one of my favorites. Punches are convenient and may take a few seconds less; however, the circle cutter saves on space! I find myself reaching for one tool rather than digging through a drawer of punches to find the right size. 

I recently bought the Snowflakes Trio Die Set from A Muse Studio, and you'll see it used in plenty of upcoming projects. Each snowflakes has a unique look and size. I've used the middle sized die for this card, adhered it to the kraft circle, and topped it off with a black pearl. The circle and sentiment are both attached to the card base with foam risers. I finished off the card with these fun pearl sequins. A Muse Studio offers several different colors, and I just had to pick up a pack of each! I never thought of using sequins as a card embellishment, but I'm loving the look now that I have. They're not as heavy as buttons and not as elegant as pearls -- just perfect for this card!

Thanks for checking out today's project! For more information on my upcoming workshops, visit me here.

CARD SUPPLIES
All A Muse Studio
Cardstock: Wasabi, Sugar, Sky, Kraft
Patterned Paper: Candy Cane Stripe
Stamps: Essential Sentiments
Ink: Memento (Tuxedo Black)
Die: Snowflake Trio Die Set
Bling: Sequins (Pearl), Pearls (Black)
Baker's Twine: Cherry

Sketch It Saturday :: Let It Snow

Saturday, December 1, 2012

Happy Saturday! It's time to show off a new sketch from Unscripted Sketches. We've put together some great inspiration for you, so grab your supplies and create something using this sketch as a starting point! 


I was excited about the possibilities that this sketch holds and will probably make a few card variations after today. I can't wait to see what you all come up with. Make sure you head to Unscripted Sketches to link up your project before next Saturday! Here's the card I created for today's challenge:

How beautiful is the background for this card? It's the new Snowflake Background Set from Hero Arts & Sizzix. You first stamp the background stamp from Hero Arts onto cardstock. Next, place the cardstock into the matching embossing folder from Sizzix, creating a crisp image on top of the embossed design. I'm loving these sets! 

I stamped a snowflake a few times onto the white oval with a light blue chalk ink that appears on the grey side. Both ovals were cut using a Spellbinders die. I added the silver ribbon between the two layers and adhered the white oval with foam risers. An elegant pearl completes the card. 

It's December 1st, and it's time for the snow to start falling here in Wisconsin. Sadly, they're predicting another warm winter. I'll keep on crafting with snowflakes in mind. Have a wonderful weekend!

 CARD SUPPLIES
Cardstock: Paper Cut (Pewter, Bamboo Bark, White), We R Memory Keepers (Winter)
Dies: Spellbinders (Classic Oval Small, Lacey Ovals)
Inks: StazOn (Jet Black), Encore (Silver), Versamagic (Aspen Mist)
Embossing Folder/Stamp: Sizzix/Hero Arts (Snowflake Background Set)
Stamps: Just Rite (Large Fancy Holiday Sentiments)
Bling: Melissa Francis (Cream Pearl)
Proudly designed by Mlekoshi pixel perfect web designs