Showing posts with label Christmas. Show all posts

Winter Cards with Plum Poppy Studio

Thursday, December 19, 2013

Recently I shared some fall themed cards created with Plum Poppy Studio stamps. I was so excited to get my hands on more of the stamps and quickly went to work creating with the Let It Snow and Ornaments stamp sets. 

Snowman Card / Plum Poppy Studio
For the first card, I used the Let It Snow stamp set. I can't get over how adorable this snowman is! He was paper pieced together with matching red and gray cardstock. The 'let it snow' phrase was stamped on the patterned paper before the ribbon and snowman were added. 

Snowman Card
The cute tree image on the second time is also from the Let It Snow stamp set. I couldn't help but paper piece it together as well... I'm addicted to fussy cutting! The simple outline of the trees allows for endless creative possibilities - color it in, stamp a design onto it, or fill it up with buttons and bling! 

Christmas Card (via shezigzags.blogspot.com)
The tree was adhered to a cut out tag from the BasicGrey 25th & Pine collection. I instantly fell in love with the large sentiments in the Ornaments collection and wanted to use them on this card. Of course, that was after I had layered everything onto the card front. Not quality planning, folks. But that's the fun in creative adventures, right?! I simply inked the oversized sentiment with black ink and stamped it onto the patterned paper and doily. I'm giddy about the result and can't wait to send the card! 

Paper Pieced Christmas Tree
It's not too late to get your hands on Plum Poppy Studio stamps... You can even get a heads start on next year's Christmas cards! Check out her online store and blog for high quailty stamp and cutting files, along with lots of inspiring projects. 

CARD ONE SUPPLIES :: Paper Cut Cardstock, Webster Pages Patterned Paper, Memento Tuxedo Black Ink, Scrapbook Adhesives 3D Foam Squares, Glitter Ribbon from Citrus Twist Scrapbook Kit

CARD TWO SUPPLIES :: Paper Cut Cardstock, BasicGrey Patterned Papers, Memento Tuxedo Black Ink, Theresa Collins Enamel Dots, Studio Calico Button, A Muse Studio Onyx Bakers Twine & Doily

Vintage Christmas : New Card!

Monday, October 7, 2013

It's never too early to start working on Christmas cards, and I've got one for you today! 

JustRite Christmas card
I instantly fell in love with the Christmas Vintage Labels stamp set from JustRite. The set includes multiple snowflakes, flourishes, sentiments, and labels. The background was created with those snowflakes and two ink colors. Brown Distress Ink was added around the edges to add to the vintage feel. 

Thanks for letting me add a little snow and cheer to your day!

SUPPLIES :: JustRite Stampers (Christmas Vintage Labels), Distress Ink (Walnut Stain), Foam Applicator Tool, Adirondack Ink (Lake Mist, Hazelnut), Archival Ink (Maroon), Paper Cut Cardstock

TOOLS :: Scrapbook Adhesives 3D Foam Squares, MyStik Permanent Adhesive, Scrapbooking Rotary Paper Trimmer

Holiday Cheer Blog Hop

Thursday, December 20, 2012

Hello, and welcome to the 
KinderStampO Guest Design Team 
"Holiday Cheer" Blog Hop!

That's right, in the upcoming months, you'll find me posting as a guest designer on the KinderStampO blog. I am so excited to share my creativity with you... We have lots of fun projects, challenges, features, and surprises in store for you. I'm so honored to be a part of it!

For those of you new to my blog, I am Nicole, a single gal living in Green Bay, Wisconsin. I'm anything but a morning person; therefore, you'll find me crafting late at night with coffee in hand. I fell in love with paper crafting about 3 years ago and mostly create cards. However, I take far too many pictures and enjoy scrapbooking as a way to preserve those memories.

For today's blog hop, we're bring you holiday cheer in the form of a project that's red, white, black, and gold. Here's the card I created:

This card was so easy and fun to make, that I made quite a few to give away this Christmas. KinderStampO has great trims, stamps, and DOILIES! As you can see, I couldn't resist placing an elegant doily onto this card! For the sentiment, I used KinderStampO's Say It In Type set. This clear, alpha stamp set is so versatile - Create any sentiment you wish! I finished off the card with some fun washi tape and gold sequins. So fun!

For joining in today's blog hop, we have a holiday gift just for you... Head over to the KinderStampO store, and take 10% off all items!
Use coupon code: holidaycheer

We also have a great giveaway!!
A stocking valued at over $100 worth of KinderStampO products.


There's lots of ways to enter:
Leave a comment on this blog post
Become a friend of KinderStampO on Facebook
Follow the KinderStampO Store
Follow the KinderStampO Blog

Your next stop on the hop is CallyAnn!

Here's a full list of the KinderStampO Guest Designers, just in case you get lost along the way. Thanks for stopping by!

Nicole Laha (me!)
Vanessa Wachlin

CARD SUPPLIES
Cardstock: A Muse Studio (Sugar, Cherry), Paper Cut (Black Linen)
Washi Tape: K&Co Smash Tape (Black Dots)
Stamps: KinderStampO (Say It In Type)
Inks: Memento (Tuxedo Black)
Doily: KinderStampO (5 inch Doily)
Sequins: A Muse Studio (Gold)

Sweet Christmas Wishes

Wednesday, December 19, 2012

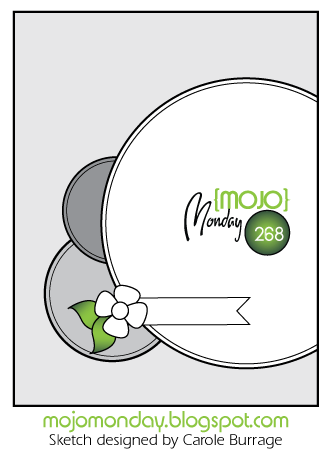
Good afternoon! Last night I found some extra time to hop into my craft room and make a few Christmas cards. I always like to check out any challenges before I get started and came across this great sketch from Mojo Monday. 


Rather than three identical images, I chose to break them up, as well as changed the placement of the ribbon. What do you think?

The sentiment was stamped on cream cardstock and adhered to the card base, bordered by dark brown. I had some extra candy cane striped cardstock and wanted to use it before the Christmas season is over! I stamped the gingerbread people onto kraft paper and decorated them a bit. The long strip of satin ribbon was adhered to green cardstock with double sided tape in order to extend over the card base. The twine was then wrapped around the card, and I hid the twine's knot behind the large bow!

Hope you've enjoyed today's card... Thanks for stopping by! I have another great announcement with you tomorrow morning, so please stop back :)

CARD SUPPLIES
Cardstock: A Muse Studio (Cherry, Kraft, Vanilla, French Roast, Wasabi)
Patterned Paper: A Muse Studio (Candy Cane Stripe)
Stamps: A Muse Studio (Candy Cane Wishes)
Inks: Copic Marker (R29), Sakura Gelly Roll Pen (White), Memento (Tuxedo Black)
Ribbon: A Muse Studio (Satin Cherry, Baker's Twine Cherry)
Extras: Copic X-Press It Double Sided Tape (1/4")
*For A Muse Studio products, please visit my webstore.

To all a good night... A special announcement!

Tuesday, December 18, 2012


Hello paper crafters! I have some fun news to share with you today! You can now find me designing for the A Muse Studio Challenge Blog! We have some great inspiration, challenges, and prizes for you in the coming year! The first challenge will be in January, and you'll want to join in! Make sure to head over to follow the blog to stay updated. 

To celebrate the announcement, I'm sharing a fun card I created using A Muse Studio products!

To create the background for this card, I cut out three snowflakes from scrap paper using an A Muse Studio die. After arranging the snowflakes on a piece of white cardstock, I sprayed the entire piece with Sky Splash!, a spray ink that coordinates with the A Muse Studio line of colors. I can't wait to try the spray on flowers, ribbons, and other embellishments!

After the spray dried, I stamped the image and sentiment, added some baker's twine, and adhered it to the card base with foam risers. To add just a little extra sparkle, I added Diamond glitter to each of the stars on the card with the Quickie Glue Pen.

If you're looking for some last minute Christmas card ideas, here's one! It was super simple and fast to create! Thanks for stopping by today, and I look forward to sharing more A Muse Studio ideas with you!


CARD SUPPLIES
All A Muse Studio
Cardstock: Sugar, Cherry
Stamps: Santa's Flight
Inks: Memento (Tuxedo Black), Splash! (Winter Sky)
Die: Snowflakes Trio Die Set
Baker's Twine: Cherry, Onyx
Glitter: Diamond
Extras: Silver Jingle Bells (9mm)

Joy To The World

Friday, December 14, 2012

Hey there! This is my second post for the day... If you're looking for the snowflake Christmas card, keep scrolling! In this post, I'm playing along with the Tuesday Trigger at Moxie Fab World. 

I had seen this photo last week when the trigger was first posted and wasn't sure how I could pull together a card with a monochromatic, neutral color combo. 


But here's what I came up with!

I started out by pulling together some cream and white cardstock. Then I discovered this patterned paper by Reminisce and a lightbulb turned on! The medallion stamp from JustRite was stamped with gold ink and embossed with clear powder. The sentiment was then stamped with brown ink to add a little contrast. JustRite and Spellbinders have teamed up to create dies that coordinate with their beautiful stamps. Here I layered the medallion dies, attaching the white piece with foam risers. 

I love the elegance of this card. Thank you for the push to create, Moxie Fab World! There's still a few days to join in the challenge yourself.. Head over to the MFW blog to link up!

CARD SUPPLIES
Cardstock: Paper Cut (Cream, White)
Patterned Paper: Reminisce (Tiptoe Through the Tulips)
Stamps: JustRite (Joy to the World Medallion Labels)
Dies: Spellbinders (Nested Oval Medallion Labels)
Inks: Encore! (Gold), Memento (Rich Cocoa), Versamark Watermark
Embossing Powder: Ranger (Clear)
Ribbon: Offray (Lady Chiffon White)
Bling: Queen & Co (Sunflower Yellow)

Merry Christmas

Friday, December 14, 2012

Good morning! Tomorrow I'm hosting my first A Muse Studio workshop. We'll be creating two cards and a tag, including this fun card below...

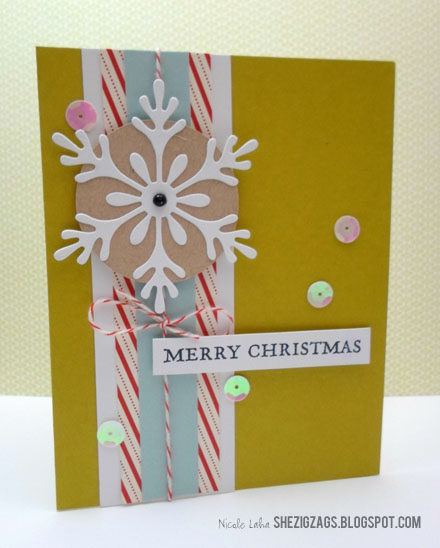
The card layout was found on the A Muse Studio website, and I made a few changes. How great is this color combination for Christmas - red, kraft, light blue, white, and wasabi?! So whimsical and fun! After adhering strips of color to the card base, I wrapped cherry baker's twine around the front and tied a bow. The kraft circle is 1-7/8" and I used the Martha Stewart Circle Cutter to create it. I have to say, this cutter has quickly become one of my favorites. Punches are convenient and may take a few seconds less; however, the circle cutter saves on space! I find myself reaching for one tool rather than digging through a drawer of punches to find the right size. 

I recently bought the Snowflakes Trio Die Set from A Muse Studio, and you'll see it used in plenty of upcoming projects. Each snowflakes has a unique look and size. I've used the middle sized die for this card, adhered it to the kraft circle, and topped it off with a black pearl. The circle and sentiment are both attached to the card base with foam risers. I finished off the card with these fun pearl sequins. A Muse Studio offers several different colors, and I just had to pick up a pack of each! I never thought of using sequins as a card embellishment, but I'm loving the look now that I have. They're not as heavy as buttons and not as elegant as pearls -- just perfect for this card!

Thanks for checking out today's project! For more information on my upcoming workshops, visit me here.

CARD SUPPLIES
All A Muse Studio
Cardstock: Wasabi, Sugar, Sky, Kraft
Patterned Paper: Candy Cane Stripe
Stamps: Essential Sentiments
Ink: Memento (Tuxedo Black)
Die: Snowflake Trio Die Set
Bling: Sequins (Pearl), Pearls (Black)
Baker's Twine: Cherry

Burlap Love :: Christmas Card Edition

Monday, December 10, 2012

Hello! I picked up this Christmas set last year from MSS but just a bit too late to use them for my cards. Therefore, they were the first ones I grabbed when creating my cards this year. I wanted to create a few holiday greetings with a more masculine feel for some guy friends. Here's to hoping they'll appreciate them and not toss them in the same piles as their junk mail! 

I started by stamping the Bits of Burlap background stamp on sugar cardstock with brown ink. When pulling together the colors and stamps, I didn't realize the irony of adding actual burlap to the card front.

Thanks for stopping by tonight!

 CARD SUPPLIES
Cardstock: A Muse Studio (Sugar, Cocoa, Navy, Evergreen)
Stamps: Market Street Stamps (Bits of Burlap, Essential Holiday Elegance)
Ink: Memento (Rich Cocoa)
Brads: Graphic 45 (Stamped Metal Brads)

Sketch It Saturday :: Enjoy The Season

Saturday, December 8, 2012

Hello! It's Sketch It Saturday with Unscripted Sketches. Our Design Team has done it once again with great cards to inspire you. Head over to the blog to see what they've created and to link up your own project. Here's this week's sketch and my take on it:


For this card I used a BasicGrey embossing folder to add some texture to the white cardstock piece as well as die cut some leaves. I also added some black ink around all the pieces. The holly leaves were cut from glitter paper by American Crafts and are GORGEOUS. However, without the inked edge, it was hard to see the individual shapes. 

I colored the ornament and bow about 12 different ways with different mediums in different colors and was unsatisfied. In fact, I was just frustrated with the overall card. I finally decided that I wanted less. Less color, less jazz. Therefore, I colored in some elements with red and let the white shine.

Thanks for stopping by and don't forget to head over to Unscripted Sketches!

CARD SUPPLIES
Cardstock: Paper Cut (White, Deep Blue Hopsack), Fossil
Glitter Paper: American Crafts
Stamps: JustRite
Inks: Memento (Tuxedo Black), Copic Markers, We R Memory Keepers (Sweetheart Inker Black), Sakura Gelly Roll Pen (White)

Create Your Own Gift Tags :: Glitter Love

Friday, December 7, 2012

Hello blogland! I received some great winter and valentine themed products from A Muse Studio yesterday. I was too busy last night preparing for a ladies tea and cookie exchange that I didn't get to play with all the fun supplies until tonight! Here's the first thing I created with the winter items:

All of the stamps and papers are currently 30% off at A Muse Studio! And this tag will be one of three projects I'll be offering in my December Workshop next Saturday. You can find out more information about my workshops by clicking here.

This tag is actually a 2-1/2" x 4-1/2" piece of Sugar cardstock. To transform it from just a piece of cardstock to a traditional tag, I cut the top corner off the right hand side. Then I placed the scrap triangle on the opposite corner as a cutting guide to ensure both sides were exact.  

How gorgeous is this even layer of glitter?! Replicating this technique is far easier than it looks! Just place a strip of 1/4" Scor-Tape onto the tag base like this:

After lifting up the tape backing, sprinkle diamond glitter over the area, tap off the excess, and use a paint brush to sweep away any stray flecks. The end result is stunning! 


To create the bottom half of the tag, cut a separate 1-1/2" x 2-1/2" piece of cardstock. Place more strips of Scor-Tape onto the piece and peal off the backing. I cut 6- 1/2"x 2" strips, but you could cut any size and quantity. Place the strips diagonally onto the cardstock base. Trim ends and adhere to the tag.

I used the Vintage Holiday Greetings stamp set which offers a few different sayings and stamped them in cherry ink. 

For a matching tag reinforcement, cut a circle from cherry cardstock using a 1/2" punch. After adhering it to the tag, use a smaller punch to create a hole through the circle and the tag base. Insert some fun baker's twine in matching cherry, and you have a gorgeous tag to add to your gifts, cards, or scrapbook pages.

I hope you've enjoyed today's project. Thanks for stopping by. 

CARD SUPPLIES
All products A Muse Studio {visit my webstore before Dec 16th for 30% off these supplies}
Cardstock: Sugar, Kraft, Wasabi, Sky, Cherry
Patterned Paper: Candy Cane Stripe
Stamps: Vintage Holiday Greetings
Ink: Cherry 
Baker's Twine: Cherry
Glitter: Diamond

Sneak Peek :: Christmas Cover Page

Tuesday, November 27, 2012


Hello bloggers! I've created a cover page for this year's Christmas album and have shared it on the Creations Galore blog for Layout Tuesday. Head over to see the full layout, as well as details about each element. 

Sketch It Saturday :: Christmas Banners

Saturday, November 24, 2012

Happy Small Business Saturday! That's right, between Black Friday and Cyber Monday, you'll find Small Business Saturday. I work at Creations Galore, an independent paper arts store in my city. I encourage all of you to support any small business in your area today! You can read more about supporting local businesses and today's holiday here.

Now let's move on to some crafty goodness. Unscripted Sketches put out one fantastic sketch this week. I absolutely love banners. The trend is still going strong. Head over to Unscripted Sketches to see the entire design team and the ways they incorporated "banners" into their paper crafting projects. Here's the sketch:


And here is my take:

JustRite has a beautiful banners stamp set that I was excited to use on this card. I stamped the smallest banners in the set on patterned papers and cardstock, cut around the design, and adhered them to the card face. I adhered the gold cord with Glossy Accents before attaching the flags. The beautiful sentiment is from JustRite as well and is stamped with black embossing powder. 

I hope you've enjoyed my take on the sketch. Don't forget to link up your own project at Unscripted Sketches... We love seeing all your creativity! 

CARD SUPPLIES
Cardstock: Paper Cut (Black Linen, Cream), American Crafts (Caramel)
Patterned Paper: American Crafts (Wreath Factory, Sleigh Shop, Lighting Department, Kringle Garden)
Stamps: JustRite (O Christmas Tree, Large Fancy Holiday Sentiments)
Inks: Memento (Tuxedo Black), Versamark Watermark
Embossing Powder: Ranger (Super Fine Detail Black)

Seasons Greetings

Friday, November 23, 2012


Hello! I hope everyone had a great Thanksgiving. Today Christmas music came on the radio full force, there were snowflakes falling on my way to work, and I bought my first gift of the season. It's put me in quite the mood! Therefore, I pulled together some Christmas-themed papers and stamps and created the above card using Mojo Monday's sketch as inspiration. 


I punched all of the circles from Marvy nesting punches. After layering them onto the birch patterned paper, I trimmed the shapes to size. The ornament and holly were both paper pieced onto the card. I just can't resist detail cutting! 


Thanks for stopping by today... May the joyful Christmas spirit find you as well!

CARD SUPPLIES
Cardstock: American Crafts, Paper Cut (White)
Patterned Paper: We R Memory Keepers (Yuletide Collection)
Stamps: Market Street Stamps (Ornaments)
Ink: Memento (Tuxedo Black)

Christmas Tag Cased

Friday, November 9, 2012

Last November, I had the pleasure of teaching a Christmas Tags Workshop at Creations Galore. This was my favorite tag from that class: 

I came across the tag this week while planning my Christmas decor, cards, and gift wrapping. It's one of my creations that I kind of drool over... Do you ever have any of those? Creations that turned out more beautiful than you ever imagined. And this one was so simple to create! Therefore, I thought I would case my own tag, turning it into a holiday card. 

I kept the design and elements, adding a few extras. I embossed the image with white embossing powder and stamped the sentiment with black StazOn. Random thought: I've never seen a bird on a buck's horns outside of a Disney movie and this card... But I absolutely love the image!

The tag is cut using an AccuCut die from similar colored papers. I used a brighter red cardstock this time around to match the patterned paper from American Crafts. I first cut the tag from the kraft colored cardstock. After embossing the stamped image, I adhered a small strip of red cardstock. Lastly, I trimmed the cardstock to keep the rounded corners of the tag.

A touch of ribbons and a pearl to add some flair to the card. 

What do you think? I'm looking forward to making a few more and sending them out for the holiday! This success has me wondering what other cards from my past creations I can case. 

CARD SUPPLIES
Cardstock: Paper Cut (Fossil, White, Red)
Patterned Paper: American Crafts (Reindeer Runway)
Stamps: Martha Stewart Crafts (Scandinavian)
Inks: Versamark Watermark, Ranger Embossing Powder (Seafoam White), StazOn (Jet Black)
Bling: A Muse Studio (White Pearl)

Christmas In July :: Alcohol Ink Coasters & Other Decor Items

Monday, July 9, 2012

Hello! If you've found your way over from Unscripted Sketches, I want to welcome you to my little blog where I share my illustrations, paper crafting projects, and life stories. I'm glad you stopped by. 

Unscripted Sketches is celebrating Christmas in July with a virtual Christmas Party, Song Bingo, and Card Challenges. There's even prizes! Head over to the US Blog to see what you've missed this past week. It's not too late to join in all of the Christmas fun! 


Today is my spotlight day, and if you visit the US blog, you'll get the opportunity to get to know me just a little bit better. I had a great time answering their questions. Now let's move on to the goods... For this virtual Christmas party, we're headed to my living room where I have a few crafty projects that will add some holiday spirit to your home. 

First up, a few Christmas tags made with some paper and ribbon scraps. 

Season's Greetings Tag

Season's Greetings Tag

Homemade Christmas Tag

And a Christmas Banner I made from 6x6 squares of patterned paper. The Letters are cut from white cardstock using the Cricut and painted with Distress Stain. To see more of this banner, visit the Creations Galore blog where I originally showed it off! 

Christmas Banner Bo Bunny Press

And a big drumroll for today's tutorial. I've created a little how-to for holiday coasters! 

Alcohol Ink Coasters

 You'll need basic tiles and some Alcohol Inks. The Adirondack line Tim Holtz has created with Ranger is my favorite group of inks. I've also used the applicator tool, felt, and craft mat with this project. 

Alcohol Ink Coaster Tutorial

Alcohol inks are designed to stick to glossy surfaces such as glossy paper, acrylic, glass, and tile! There are many different techniques for applying the ink to your surface, but today I used the pounce technique. You add a large drop of ink onto the felt applicator tool and pounce it onto the tile. 

Adirondack Alcohol Inks

For the first tile, I used Rust, Red Pepper, Cranberry, and Pink Sherbert. By simply adding Oregano and Lettuce to the collection of colors, you end up with the tile on the right hand side below. What a difference in color! 

Adirondack Alcohol Ink Tutorial

You can continue adding color onto the tile until you're happy with the result. To stamp on glossy surfaces, I go to my trusty StazOn ink. As you can see, stamping on tiles can be somewhat of a challenge. The first tile, I didn't stamp too hard and missed a bit of the image. On the second, I pushed so hard that I moved the stamp and got a faded, double image. But no worries! This is one craft boo-boo we can fix!

Adirondack Alcohol Ink Coaster Tutorial

Grab some of the Alcohol Ink Blending Solution from Ranger and squeeze a few drops onto the tile. You can remove all of the ink or just a portion! 

Alcohol Ink Blending Solution

And then try the technique again! With alcohol ink, a small amount goes a long way; therefore, I never worry when I need to start over! 

Adirondack Alcohol Ink Coaster Tutorial

Now you can stamp any image you'd like. Blank tiles can be found at your local hardware store for under $1, and therefore, and inexpensive gift. You could easily and affordable make a set for every season! 

Alcohol Ink Tutorial

Alcohol Ink Coaster


Have you tried alcohol inks and want to take it a step further? How about a resist technique?!

For this technique you'll need to gather some embossing supplies. Start out by rubbing a static pouch onto the tile to eliminate any static or moisture. I always use this before embossing! Next, use an embossing ink pad to stamp your images onto the tile. I use VersaMark Watermark as it leaves a clear image at the end of this technique. Sprinkle on some clear embossing powder, tap off the excess, and use a heat tool to cure the powder. 

Heat Embossing

Add your alcohol ink over the top of the clear embossed images. For this coaster, I used Pool, Cool Peri, Eggplant, and Denim.

Alcohol Ink Resist

Once you've added the alcohol ink you'll need a scrap piece of paper and an iron. I have found that thin computer paper and a craft iron work best, but use what you have on hand. Lay the paper on top of the tile, and then iron the surface. You'll start to notice the embossed images melting and attaching to the paper. You'll need to quickly pull up the paper as you melt the image. If you pick up your paper and it sticks to the tile, be patient. You've just allowed the powder to cool again. Add more heat with the iron and try removing the paper. It should easily come right off, along with the melted embossing powder and ink. The result? White snowflakes!

Alcohol Ink Resist Tutorial

I hope this has inspired you to create some Christmas projects or gifts. Don't forget to head over to the Unscripted Sketches blog to see what the other design team members are creating and join in the fun! Thanks for stopping by the blog today!
Proudly designed by Mlekoshi pixel perfect web designs