Showing posts with label Penny Black. Show all posts

Celebrate In Style

Wednesday, May 14, 2014

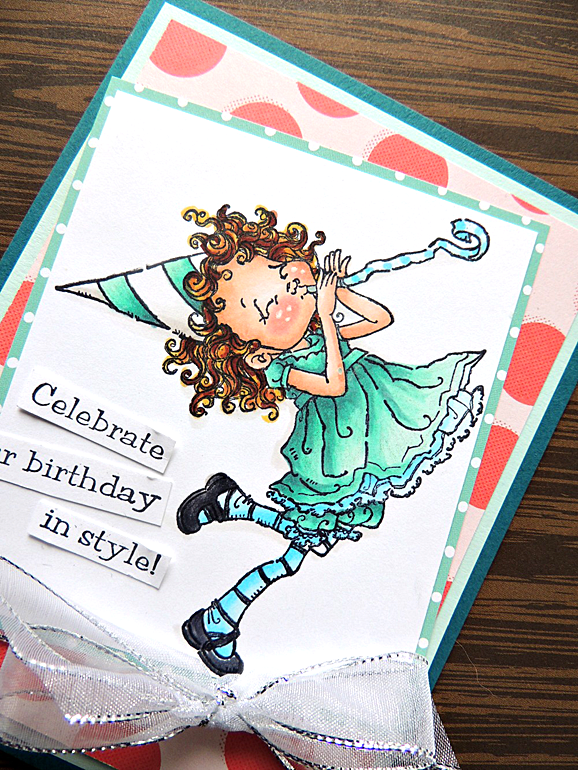
Good evening! Earlier this week I sat down with my Copic markers and enjoyed coloring the day away... I couldn't help it once I acquired this adorable stamp from Penny Black Inc.

Penny Black Birthday Joy Card by She Zig Zags
After coloring the image, I adhered it to an A-2 card base with several layers of patterned paper by Lawn Fawn and American Crafts. Easy embellishing with metallic ribbon and a simple sentiment! 

Penny Black Birthday Joy Card Copic Markers
So in love... I think I'll color a few hundred more. Thanks for stopping by!

SUPPLIES :: Paper Cut Cardstocks / American Crafts Summer Paper / Lawn Fawn Polka Dot Patterned Paper / Penny Black Inc Birthday Joy Stamp / Copic Markers / Memento Tuxedo Black Ink / Uni-Ball Signo White Pen

COPIC COLOR LIST :: Dress BG10, BG11, BG13, BG18 / Light Blues B000, B00, B02 / Shoes C-7 / Skin E00, E01, E11, R20 / Hair E15, Y26, E18 / Shadows C-1, C-3

Card Making Monday : Peace on Earth

Monday, December 16, 2013

Happy Monday! I'm back with a new card to share. This week I used a nativity scene stamp from Penny Black Inc. With Christmas only 9 days away, I'm squeezing in as many holiday themed cards as I can!

Distress Inks were used to create the background. I stamped the image once on the background, a second time on white cardstock, and a third time on gold cardstock. Rather than coloring in the image, I chose to fussy cut everything! 

SUPPLIES :: Paper Cut Cardstock (Cocoa, White, Antique), Penny Black Inc Peace on Earth Cling Stamp, Memento Tuxedo Black Ink, Distress Inks (Faded Jeans, Black Soot, Tea Dye)

TOOLS :: EK Success Large Corner Rounder, Scrapbook Adhesives 3D Foam Risers, MyStik Permanent Adhesive, Inkssentials Ink Applicator Tool

Card Making Monday

Monday, December 2, 2013

Hello and Happy Monday! It's time to share a few new Make N Takes I've created for Creations Galore this week. If you're local, I'd love for you to stop by and have some fun with us!

Get Well Soon Card
Both cards I'm sharing today are quite simple. For this card, a border was created with a Martha Stewart punch and added to the front. All of the papers came from Bo Bunny's The Avenues collection. The stamp is from Sweet Stamp Shop... Love the whimsical handwriting. 

Get Well Soon Card
For the second card, I heat embossed the sentiment from Penny Black onto white cardstock using Ranger Ultra Fine Detail Gold. I kept it simple, adding two coordinating paper strips along the left hand side. 

Smile Card (via shezigzags.blogspot.com)
Heat embossing
Nothing too fancy today, but these would be quick and easy to create for Christmas gifts. Just package a few together and wrap pretty! 

Card Making Monday

Monday, November 18, 2013

Happy Monday! I had a little fun with some colored pencils recently and am here to share the finished card with you. 

This lovely image is by Penny Black Inc. After coloring the image, I added a bit of Distress Ink to soften the edges of the white cardstock. A simple card to throw together, but it provided lots of stress relief! 

Thanks for joining me for another Card Making Monday... Enjoy your week!

SUPPLIES :: Paper Cut Cardstock, American Crafts Patterned Paper, Prismacolor Pencils, StazOn Jet Black Ink, Vintage Photo Distress Ink

TOOLS :: Tim Holtz Foam Applicator Tool, Acrylic Block, Scrapbook Adhesives 3D Foam Risers 

Card Making Monday

Monday, October 21, 2013

Happy Monday! Today I'm sharing a Make N Take I created for Creations Galore this week. If you're local, I'd love for you to stop in and create this card, along with three others available. You can see them by clicking here.

Sympathy Card (via shezigzags.blogspot.com)
This card came together quickly! Just a few layers of cardstock and patterned paper, a beautiful Penny Black sentiment, and satin ribbon. Satin ribbon is my go-to supply for elegant cards. 

Sympathy Card
Thanks for stopping by today. I hope your week is off to a great start!

SUPPLIES :: Paper Cut Cardstock & Patterned Paper, Penny Black Stamp, StazOn Jet Black Ink, Black Satin Ribbon

TOOLS :: Acrylic Block, Tonic 12" Guillotine, MyStick Permanent Adhesive, Scor-Pal

Use It Tuesday :: Uninked Stamps

Tuesday, August 13, 2013

Vellum die cut flowers

Hello paper crafters! Use It Tuesday is back with one of our favorite challenges - UNINKED STAMP! I know that you have them... So get them out and create! 

After you've patted yourself on the back and marveled at your gorgeous creation, head over to the Use It Tuesday blog to link up by Friday, August 23rd. Make sure you mention you're playing along with us and mention your hoarded supplies. As always, one lucky participant will be randomly chosen to be a featured guest designer in an upcoming challenge!

Distress Ink background

I just love this stamp from Penny Black, part of a clear stamp set called . I wanted it to appear as a bold statement; therefore I stamped it black ink on white cardstock. For the background, I used the foam applicator tool to add three colors of Distress Inks. Because the inks are water based, they react beautifully to a few drops of water.

I finished up the card with a Lifestyle Crafts die that has gone untouched for over a year. The leaf was cut from patterned paper, the flower base from cardstock, and the layer from vellum. An eyelet was put through the middle to hold the layers together. It was so easy to make a dimensional embellishment! I'll need to use this more often!

Vellum die cut flowers

Now it's your turn! I can't wait to see what stamps you pull from your stash! Don't forget to see the lovely creations my fellow design team members created on the Use It Tuesday blog. 

SUPPLIES :: Paper Cut (Vellum, White Cardstock), American Crafts Cardstock, We R Memory Keepers patterned paper, Gary M Burlin Black Eyelets, Penny Black Friendship Clear Set, StazOn Jet Black ink, Distress Inks (Mustard Seed, Shabby Shutters, Peeled Paint)

TOOLS :: A Muse Studio Acrylic Block, Tonic 12" Guillotine, MyStik Permanent Adhesive, Scrapbook Adhesives 3D Foam Squares, Lifestyle Crafts Plumeria Die

Practical Scrappers August Card Sketch :: Plus Watercolor Tutorial

Friday, August 2, 2013

Good morning! Practical Scrappers is welcoming August with a brand new card sketch. We'd love for you join us... Post your own creation on our Facebook page. I can't wait to see what you create!


Here's the card I created:

I created a faux polaroid frame by cutting a square of light green paper smaller than a black rectangle. The flower image was stamped with black embossing powder, while gold was used for the sentiment. The first part of the sentiment took the place of three pieces of bling... I loved that it was smaller than the hello! 

The green and purple papers used for the square and banner came from the Chalkboard collection by We R Memory Keepers and had an ombre watercolor look to them. To incorporate that theme to other elements of the card, I used this amazing video tutorial from Kristina Werner.


I used Tattered Rose, Dusty Concord, and Old Paper Distress Inks for the background. It was extremely easy and FAST! I created a few additional backgrounds (it was just too fun), but no two were the same! You just have to watch the video above and give it a try for yourself!

I used a few of the droplets of ink left on my craft mat, along with a paint brush, to add a small amount of color to the embossed flowers. It has a subtle color that really highlights the image. 

Thanks for stopping by... And don't forget to check out what my fellow Design Team members created with this month's sketch on the Practical Scrappers Blog!

CARD SUPPLIES 
Cardstock: Paper Cut (Watercolor, Black)
Patterned Paper: We R Memory Keepers (Chalkboard Collection)
Stamps: Penny Black (Flowers Sweet, Friendship)
Inks: VersaMark Watermark, Distress Inks (Dusty Concord, Tattered Rose, Old Paper)
Embossing Powders: Ranger (Gold, Fine Detail Black)

Let's Catch Up

Wednesday, June 5, 2013

Good morning! I'm stopping by today to share a few cards I've created lately for Make N Takes at Creations Galore. I love the instant gratification that comes with whipping up a quick card.

I just died when I first saw this Penny Black stamp! How cute is she?! I did very little blending and shading with Copic markers on this image, making it easy to whip up a few to have on end!

I'm so sad to report Market Street Stamps has closed its doors. I loved their high quality and GORGEOUS stamps. They still have a few stamps available in their online store. But act quickly - Once they're sold out, they're gone! I made the card above with the Dreaming of the Sea stamp set. The background was made on glossy cardstock with Lettuce, Stream, and Raspberry Alcohol inks. The mermaid was then heat embossed with Princess Gold embossing powder from Ranger. MMS will be missed... I cry a little every time I think about it. Wish all the best to them on their new adventure!

Lastly, I have this card made inspired by my fisherman of a pops. The edges of each piece was distressed with the Tim Holtz Distressing Tool. The Hearts & Arrows Wood Veneers and spray ink is from Studio Calico. 

Thanks for stopping by to see what I've been up to lately!

How many squares can you layer on a card?

Tuesday, April 23, 2013

Good morning and thanks for stopping by. I'm sharing the newest sketch from Unscripted Sketches! Have you played along yet?


At first glance, this sketch looks a little busy. Many of my fellow design team members turned this sketch into a scrapbook page. And it worked! They rocked their pages. When you study the sketch, you'll see there is a main focal point, four squares in each corner, and two rectangles on each side. To keep my card from being too overwhelmed, I got rid of one of the rectangles on each side and created this:

I used Marvy nesting punches to create the rectangles, squares, and circle. Next, I add some doodles to the pieces, embossed a sentiment, and adhered it together. It ended up being the easiest card I created this week! 

We'd love to see you join in the fun! You still have a few days left to link up your own paper crafts creation using the above sketch as inspiration. 

 CARD SUPPLIES
Cardstock: Paper Cut, American Crafts
Patterned Paper: Bo Bunny (Ad Lib Collection)
Stamp: Penny Black Inc.
Inks: VersaMark Watermark, ZIG Writer (Black)
Embossing Powder: Ranger (Seafoam White)

Use It Tuesday -- 50th Challenge!

Tuesday, February 26, 2013

Good morning! I'm so excited you've joined me today. Use It Tuesday is turning 2, and we're partying hard during our 50th challenge! 

Challenge 50: Create a project using an un-inked stamp. Bonus points if you use GOLD! 

I'll admit, I have several un-inked stamps. So this challenge was going to be an easy one... until I had to decide which one to use! I decided to break out this set from Tim Holtz. The background stamps in this set feature reverse imagery. That's right - The words are backwards. I always liked the idea of stamping the background directly onto the embossing folder, but never found a folder I wanted or could use with such a technique. What a great excuse to go shopping! 

After a walk around Creation Galore's store, I came across this beautiful swirl embossing folder by Sizzix. I stamped the script background three times directly onto the embossing folder, inserted the cream cardstock into the folder, and ran it through my machine. When it came out, the script does not show up on the embossed edge, creating multiple layers easily. 

I applied Antique Linen Distress Ink to the embossed design with the ink pad directly. To add some depth, I added Forest Moss to just the edges of the cream cardstock with the applicator tool. 

For the gold element of the challenge, I embossed this flower stamp from Penny Black onto vellum. I also added some gold cord around the sentiment, and tied a bow. 

Thanks for stopping by today... Make sure you head over to the Use It Tuesday blog to see more inspiration and play along!

The easiest cards I've ever created...

Wednesday, February 20, 2013

Hello! Today I'm showcasing an upcoming class I'm teaching at Creations Galore. We received a wide variety of sticker sheets from Penny Black like the one below into the store. Challenged with how I could use them, I gathered together a limited amount of supplies and set the timer for one hour. Here's a list of my supplies: 


1- Penny Black sticker sheet {The above is Embrace}
1- 8.5x11 piece of patterned paper {Paper Studio White Polka Dot}
7- 8.5x11 pieces of solid cardstock 
1- Ribbon scrap
Stapler
Circle punch
3- Sentiment Stamps
Adhesive {MyStik Permanent} 
Journaling Pen {Black ZIG Writer, White Sakura Jelly Roll}

I chose to add some fun details with the ribbon scraps, stapler, and markers; however, these are not necessary items. I did not want to use more than the papers I had chosen, which coordinated nicely with the stickers. This really propelled me to use every scrap. Many of the card elements were results of me looking through what pieces I had left. Let's take a look at the creations:

7 cards and 2 tags! I didn't have enough cardstock to create full cards with the last two stickers on my sheet. So I opted for tags! I'm so glad I pushed myself to make as much as I could with the supplies, because those scraps would have made their way into the trash or continue to clutter my desk. Instead, they're beautiful creations ready to brighten someone's day! 

After creating the cards, I realized this was by far the greatest thing EVER! At only $2.50, Penny Black Sticker Sheets are a must-have! I completed everything in under an hour! An hour! Sometimes I can't complete a single card in 24 hours! The stamping, coloring, and cutting was already done for me! Which led me to think how affordable it was. I didn't need 9 different stamps, nor did I need a collection of markers or inks. 

It may sound like it, but Penny Black didn't give me free stuff, nor am I working for them. I'm just so excited at how simple and affordable this bundle of cards was to create. I'm planning on packaging them up and giving them as a gift. If you're intimidated by card making or still gathering a collection of supplies, you'll want to give this a try! 

Sketch It Saturday :: Hugs & Kisses

Saturday, January 26, 2013

Hello folks! It's another Sketch It Saturday with Unscripted Sketches, and they've got a great sketch for you to try out this week! 


And here's my take on the sketch:

I left the large circle in the same position, but changed the card to a landscape design. The design was also changed by moving the two smaller circles and adding a heart and sentiment. But that's the great part about a sketch - It's just a starting point for creativity! 

We'd love to see what you create with the sketch. Link up your project at Unscripted Sketches for a little blog love! 

 CARD SUPPLIES
Cardstock: Paper Cut, American Crafts
Patterned Paper: We R Memory Keepers
Stamps: We R Memory Keepers
Ink: StazOn (Jet Black)
Punches: Marvy Nesting Punches

Sketch 195 :: Card Making with Stickers

Sunday, January 20, 2013

Welcome to Sketch it Saturdays with Unscripted Sketches! As you can see, I'm running a bit behind on my post... so sorry! If you've never heard of Unscripted Sketches, every Saturday morning we post a sketch for the week. Flip the sketch, rotate it… create a card, a scrapbook page, or anything your imagination comes up with! There is no right or wrong way, as long as you are using the Unscripted Sketch as the inspiration and basis of your creation!

 
This week, we not only have a great sketch for you, but it's time for our monthly PIGGYBACK CHALLENGE! During the piggyback week, we add an additional, optional challenge. This week's challenge element is to use STICKERS! 
 

For my card this week, I started with a great sticker from Penny Black Inc. Penny Black has a great collection of clear and wood mounted stamps. In addition, they carry sticker sets that can easily be turned into beautiful cards. I punched three circles from black cardstock and used them as the bottom element of the sketch. Because the stickers was larger than the sketch called for, I didn't add the second rectangle, and opted for a small sentiment to the left of the image. 

Make sure to check out the rest of the designers' creations this week... They've all used stickers in unique ways. Now pull out your stickers, old and new... I can't wait to see what you create with them!

Have a great day...

Thursday, January 17, 2013

All of my craft time in my studio the last few weeks has been devoted to scrapbooking. I'm happy to finally be documenting my recent trips and memories into an album; however, I've missed the excitement and instant gratification that comes from card making. Therefore, I spent my afternoon making nothing but cards. Woo hoo! Eleven cards and two tags later, I have a little something to show you... This card using the most adorable image from Penny Black. Hope you enjoy :)

CARD SUPPLIES
Cardstock: American Crafts, Copic X-Press It Blending Paper
Stamps: Penny Black
Inks: Memento (Tuxedo Black), Copic Markers

Never Stop Dancing

Monday, October 29, 2012

Good morning! Man, does it feel like Monday today. I'm tired, I'm dragging, I'm dropping everything. Ugh. Don't you just hate days like that?! I am, however, getting lots of work done at the office today, including gathering together the supplies for three new make n takes. Here's a look at my favorite one this week: 

I love this stamp set from Penny Black! I stamped the image with black Memento ink and colored it in with Prismacolor pencils. The colors were not exact, but it's still a fun card! Can't wait to send this off to a friend! 

To take a look at the other cards I created this week for Creations Galore, head to the blog.

CARD SUPPLIES
Cardstock: Paper Cut
Patterned Paper: We R Memory Keepers (Elanor, Ethel)
Stamps: Penny Black (Never Stop Dancing)
Inks: Memento (Tuxedo Black), Prismacolor Pencils
Punch: EK Success Large Round Corner.

Bat Cat Attack

Monday, October 1, 2012

It's October 1st, fall is here, and Halloween is on its way. Sending out cards seems like the best way to celebrate! Here's my card to you: Happy Harvest, my friends. 

CARD SUPPLIES
Cardstock: Paper Cut
Patterned Paper: We R Memory Keepers
Stamp: Penny Black (Bat Cat)
Inks: Memento (Tuxedo Black), Prismacolor Pencils
Bling: Hero Arts

Sending You Flowers

Tuesday, June 5, 2012


Just a little faux stitching, Distress Ink, floral goodness for you today. 
Hope you're having a wonderful Tuesday. 


CARD SUPPLIES
Cardstock: Paper Cut
Patterned Paper: Reminisce
Inks: Distress Ink (Vintage Photo), StazOn (Jet Black), ZIG Writer (Black)
Stamps: Penny Black 

Voice of the Heart - Dimensional Butterflies

Wednesday, May 9, 2012


Hello friends. Today I'm sharing a card I created using this week's sketch from Unscripted Sketches as inspiration. I changed up the sketch a bit, but stuck with the quote suggestion. And I just couldn't resist the dimensional butterflies. It makes this larger stamp come to life!


The sentiment got a little lost on the card, so I added black pigment ink around the edges and some stitched ribbon.


To recreate the dimensional flowers yourself, gather any butterfly stamp and tacky glue. For this specific card I used the Brown Eyed Susan stamp from Northwoods; however, I've used this technique on multiple other butterfly images. 


Stamp and color the image as you wish. Then stamp the image again, coloring only the butterflies. Cut out the butterflies and fold in half with the colored side inward. Add a little glue to the fold and adhere to the first stamped image. I love using Glossy Accents from Inkssentials. It appears as an epoxy sticker when applied over a sticker, paper, or stamped image and allowed to dry. However, it also is a fast drying, clear, incredibly durable adhesive. It's my go-to-glue for buttons, twine, and metal embellishments. 

Head on over to Unscripted Sketches to view this week's sketch, see what the rest of the Design Team whipped up, and enter a card yourself! I'd love to see what you create.

CARD SUPPLIES
Cardstock: Copic X-Press It Blending Card, Paper Cut
Stamps: Northwoods, Penny Black
Inks: Copic Markers, Memento Dye (Tuxedo Black), ColorBox Pigment (Black)
Ribbon: MayArts 

COPIC LIST
Flowers: Y06, Y08, Y26
Centers: E17, E18
Leaves: G21, YG63, YG67
Blues: B93, B02, B05
Purples: V12, V15, V17
Oranges: YR02, YR04, YR07
Proudly designed by Mlekoshi pixel perfect web designs